
Cleaning rubber shoe soles is a straightforward process when approached correctly. The method requires a quality, pH-balanced shoe cleaner, a selection of appropriate brushes, and a microfiber towel. The key to an effective and safe clean is understanding the material properties of the sole and using gentle, circular motions to lift contaminants without abrading the rubber. For deeply embedded soil, a medium-bristle brush may be necessary, but aggressive force is counterproductive.
Why Rubber Soles Degrade: Dirt, Stains, and Oxidation
Before beginning any cleaning procedure, it is essential to understand the material you are treating. A precise diagnosis of the issue—whether it's surface dirt, a deep stain, or chemical degradation—dictates the correct course of action. Whether your soles are vulcanized rubber, polyurethane, or EVA foam, their appearance is a direct result of their material composition and environmental exposure.
Most modern footwear utilizes synthetic rubber compounds like polyurethane or EVA (ethylene-vinyl acetate) for its midsoles and outsoles. These materials are engineered for durability and shock absorption, but they are inherently porous. This microporous structure acts as a repository for dirt, dust, and grime from every surface you traverse.
This porosity is why a simple surface wipe often proves insufficient. Dirt becomes physically embedded within the material, leading to a dull, discolored appearance that worsens over time if not properly addressed.
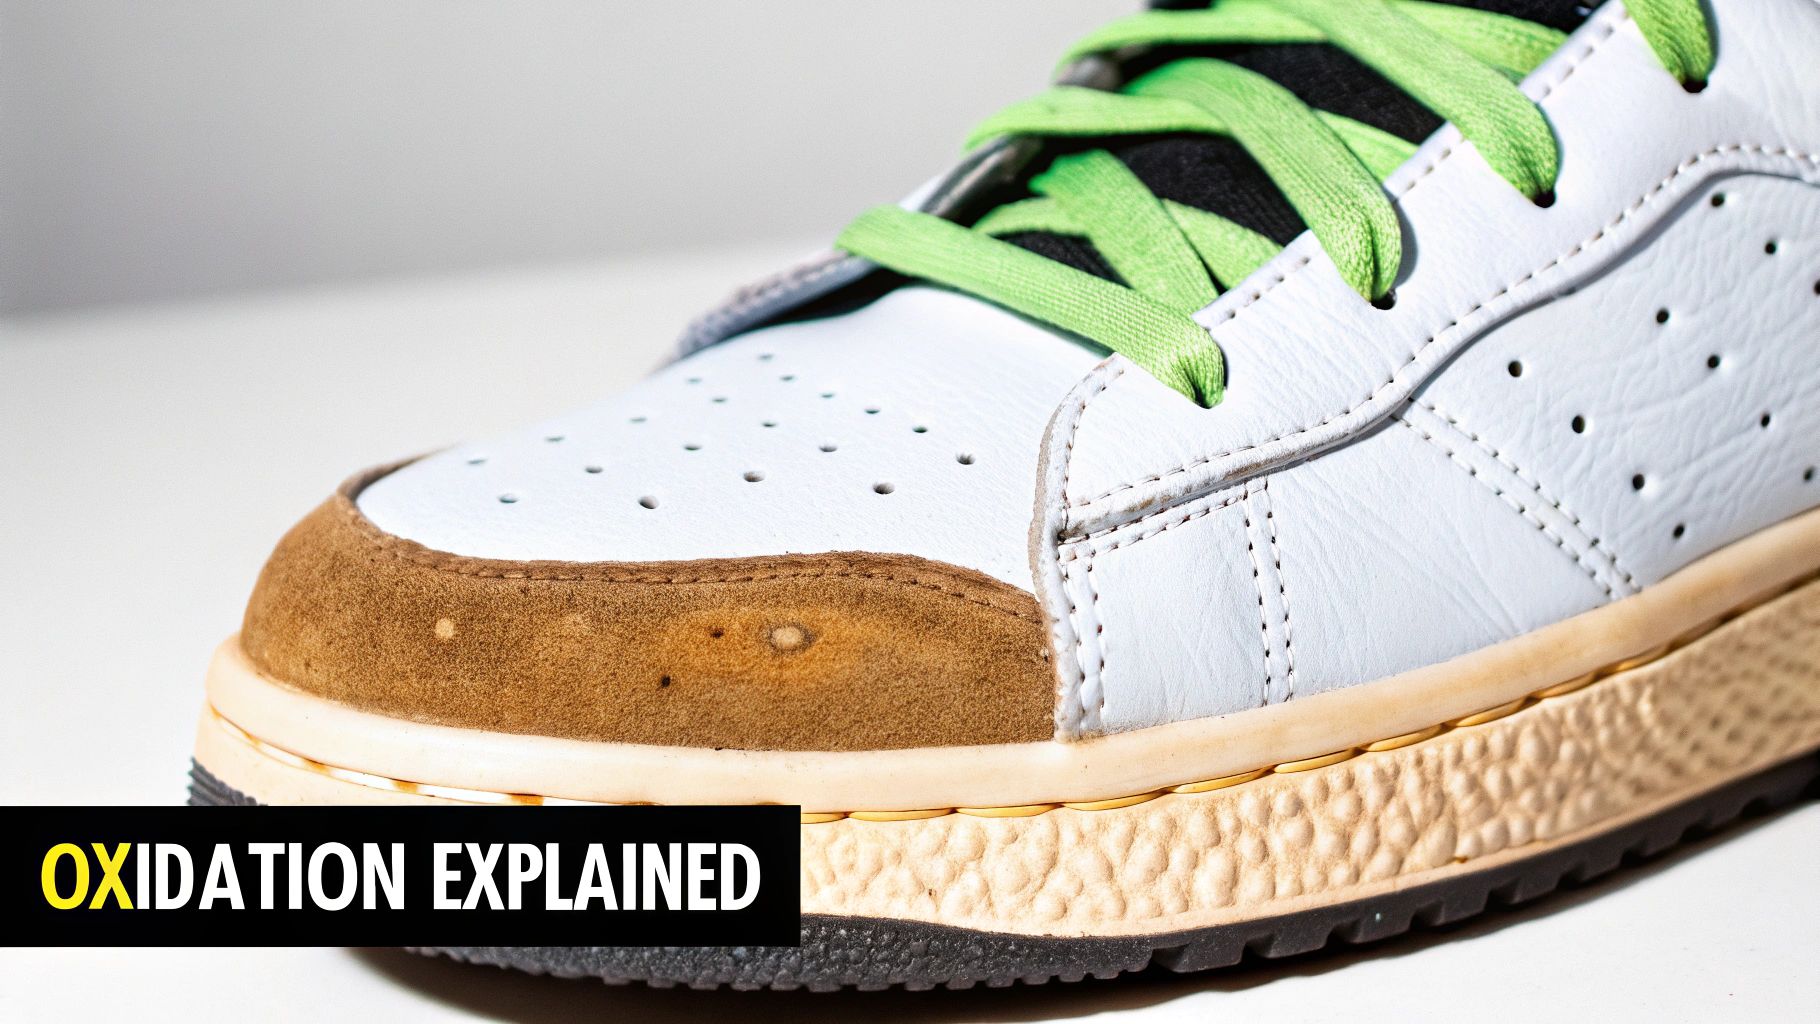
The Science of Yellowing
Beyond surface contamination, the most common issue affecting white and translucent soles is yellowing. This is not merely a stubborn stain but a chemical reaction known as oxidation. This process is accelerated by two primary factors:
- Oxygen Exposure: The polymer chains within the rubber naturally react with atmospheric oxygen. Over time, this interaction alters their chemical structure, resulting in a shift in color.
- UV Radiation: Ultraviolet radiation from sunlight acts as a catalyst for oxidation. It degrades the stabilizing agents mixed into the rubber compound, exponentially speeding up the yellowing process.
This explains why a new pair of shoes can remain pristine in its box for years, while an identical pair worn outdoors for several months will begin to yellow.
Expert Takeaway: Oxidation is an inherent characteristic of the material's aging process and does not indicate poor quality. Proper footwear care focuses on mitigating this process by removing contaminants and limiting direct UV exposure.
At Gold Standard, we have analyzed countless instances of sole damage caused by improper cleaning techniques. Overly aggressive scrubbing with abrasive brushes can wear down traction patterns and mar the sole's finish. Worse yet, the application of household chemicals like bleach can strip essential plasticizers from the rubber, leaving it brittle and susceptible to cracking.
Effective cleaning is a matter of balance—removing foreign matter while preserving the integrity of the material. Understanding this principle is the foundation for selecting the right methods to restore your soles without causing irreversible damage.
Assembling a Professional-Grade Cleaning Toolkit
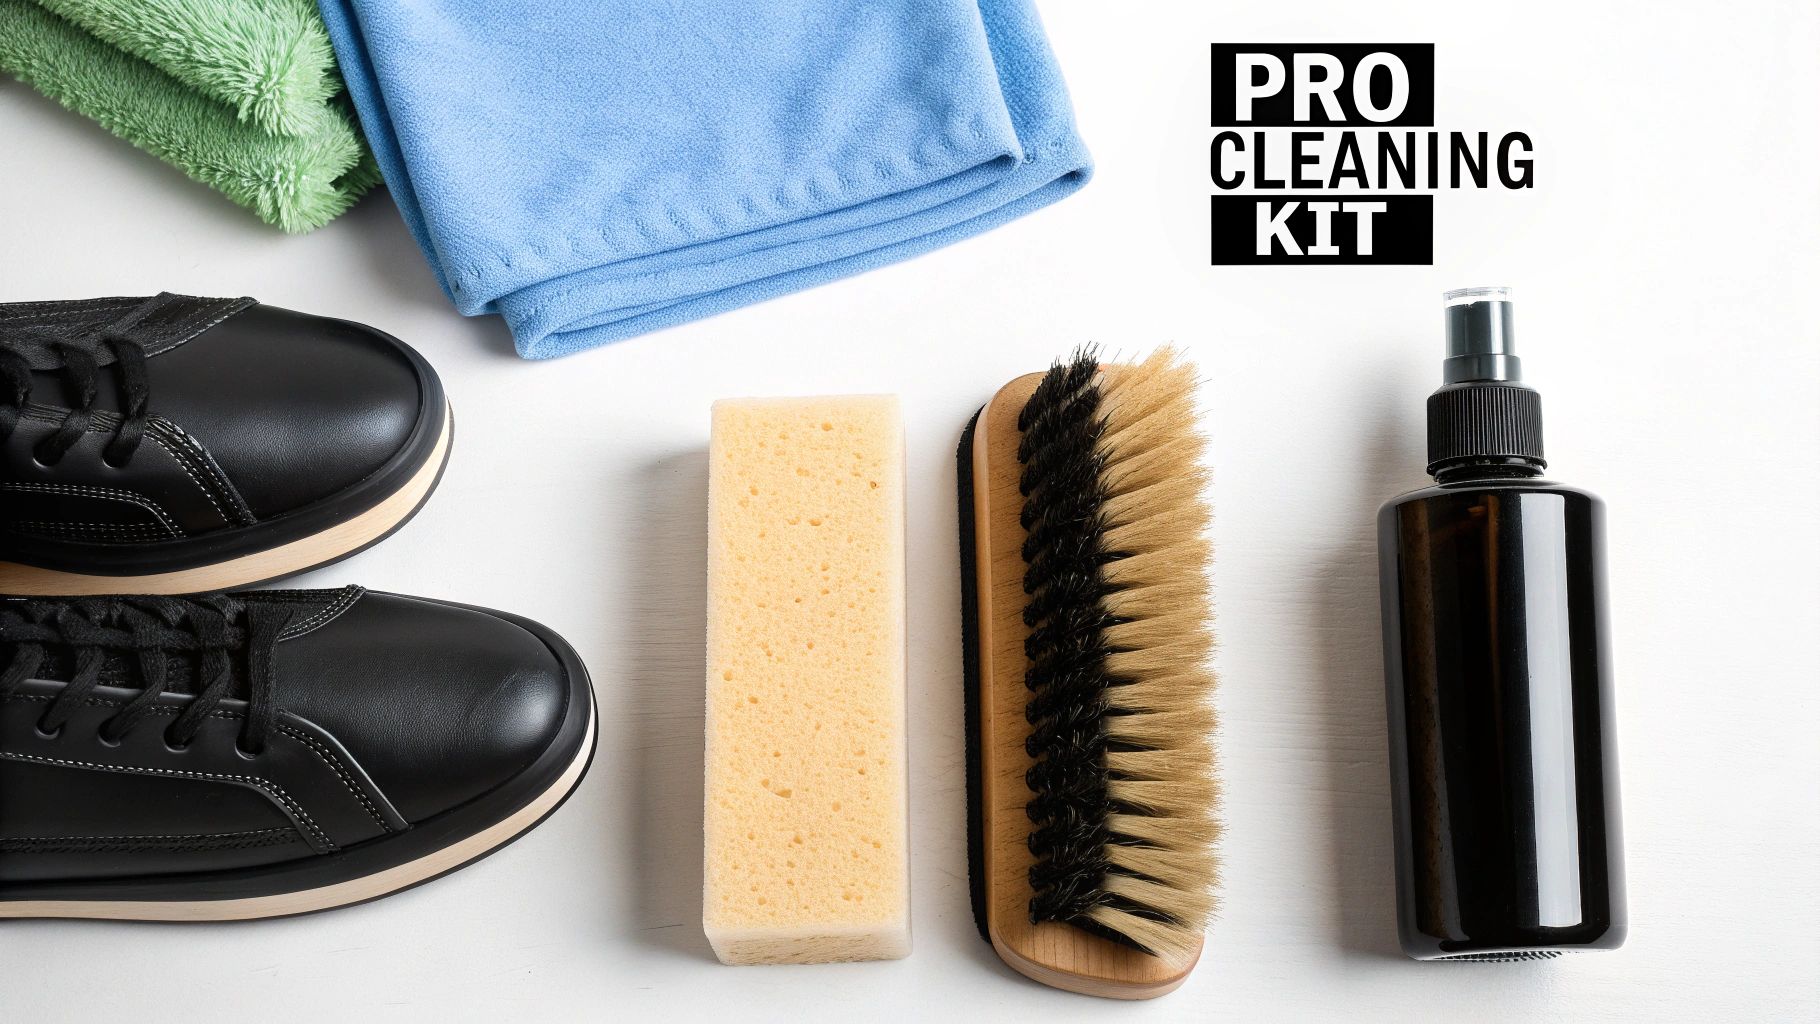
Restoring rubber soles to a like-new condition is contingent upon using the correct tools. The common practice of using arbitrary household brushes and soaps is a primary cause of material damage. Generic products often contain harsh surfactants and are not formulated for the specific chemical makeup of modern footwear.
A dedicated cleaning kit is not an extravagance reserved for collectors; it is a fundamental component of proper footwear maintenance. The right equipment prevents micro-abrasions and chemical degradation that prematurely age shoe soles.
Brush Selection and Application
This is a critical area where mistakes are frequently made. A brush with excessive stiffness can cause irreparable damage to the sole's texture. A proper toolkit should contain a range of brushes for specific tasks.
- Medium-Bristle Brush: This is the workhorse for approximately 90% of cleaning tasks. Its bristles are firm enough to dislodge dirt from grooves and textures but soft enough to avoid scratching or dulling the rubber surface.
- Stiff-Bristle Brush: Reserve this tool for heavy-duty applications, such as removing caked-on mud from the deep lugs of trail runners or work boots. It is effective on durable, unpainted rubber but requires a controlled, light touch to prevent damage.
The Cornerstone: A pH-Balanced Cleaner
The single most important element of your kit is a dedicated, pH-balanced sneaker cleaner. We have observed countless cases of sole degradation—brittleness, cracking, and yellowing—caused by the use of household detergents. These high-alkaline formulas are designed to strip grease and oils from fabrics; they have the same effect on the essential compounds in rubber.
A purpose-built solution, like the Gold Standard Cleaner, is formulated to break down dirt and oils without harming the sole's material. It works by lifting contaminants from the material's pores rather than simply bleaching the surface.
Field Tip: When a quality cleaning solution is agitated with a wet brush, it should create a dense, stable foam. This foam encapsulates dirt particles, lifting them away from the sole so they can be wiped off cleanly rather than redistributed across the surface.
Finally, a high-quality microfiber towel is essential. Its fine fibers are designed to trap and remove the soiled foam, leaving a residue-free surface that cannot be achieved with cotton rags or paper towels. To further expand your professional toolkit, review our comprehensive guide to the best sneaker cleaning kit.
The Two-Minute Daily Maintenance Routine
The most effective method for maintaining pristine shoe soles is not an infrequent, intensive cleaning session, but rather consistent, brief upkeep. The objective is to remove daily surface contaminants before they have the opportunity to penetrate and bond with the rubber.
This habit is the single greatest factor in preserving a factory-fresh appearance. It requires less than two minutes but significantly reduces the need for deep cleaning, thereby preserving the color, texture, and structural integrity of your soles over the long term.
The Initial Dry Brush
Before introducing any moisture, begin with a dry, medium-bristle brush to dislodge any loose dust, dirt, or debris from the sole's surface.
This preliminary step is critical. Neglecting it means that subsequent moisture will turn dry particulate into an abrasive slurry, forcing grit deeper into the rubber's pores. For urban environments, this may involve only light dust. However, after traversing natural or unpaved surfaces, this step is non-negotiable for removing fine particles that can cause micro-scratches and accelerate wear.
This is a foundational practice endorsed by footwear care specialists. Routine dry brushing after each wear in demanding conditions, or weekly for casual use, can reduce long-term discoloration by an estimated 20–40% annually. You can find additional insights from shoe care professionals that corroborate the importance of preventative maintenance.
Expert Takeaway: Consistency is more impactful than intensity. A brief, daily cleaning routine is far more effective at preventing long-term staining and yellowing than an aggressive, infrequent deep clean.
The Follow-Up Wipe
After dry brushing, take a clean microfiber towel and moisten it with water. The towel should be damp, not saturated; wring it out thoroughly.
Wipe down the entire sole and midsole with firm, even pressure. The unique structure of microfiber is engineered to attract and trap the fine dust particles that remain after brushing. This is also the opportune moment to spot-treat any minor scuffs acquired during the day with a small amount of cleaning solution.
The Gold Standard Method for Deep Sole Restoration
When routine maintenance is insufficient, a more thorough restoration is required. This is not a matter of brute force but a systematic process designed to lift embedded contaminants and restore the sole's appearance without damaging the rubber. This is the precise methodology we have refined at Gold Standard to revive even severely neglected footwear.
First, prepare your workspace. Lay down a towel or mat to protect the underlying surface. Always remove the laces to prevent contamination and to allow unimpeded access to the entire shoe.
Sole Preparation: The Dry Brush Phase
Your first action is a comprehensive dry brushing. Using a medium-bristle brush, scrub the entire sole vigorously to dislodge all caked-on mud, pebbles, and other loose debris. Pay special attention to deep treads and textured areas where contaminants accumulate.
Do not omit this step. Introducing water to dry dirt creates mud, which will be ground deeper into the rubber's porous structure. A thorough dry brush prepares the surface, allowing the cleaning solution to act directly on embedded stains.
Expert Takeaway: The preparation phase is analogous to sanding wood before finishing. It creates a clean substrate, which is essential for achieving optimal results during the wet cleaning phase.
The Wet Cleaning Process
Now, introduce the cleaning solution. We exclusively recommend a high-quality, pH-balanced formula like the Gold Standard Cleaner. Add a small amount to a bowl of cool water and agitate with your brush until a thick foam develops. Remember, it is the foam that performs the cleaning, not the water itself.
This fundamental routine is the basis for all proper shoe care, from a quick daily wipe to a full deep clean.
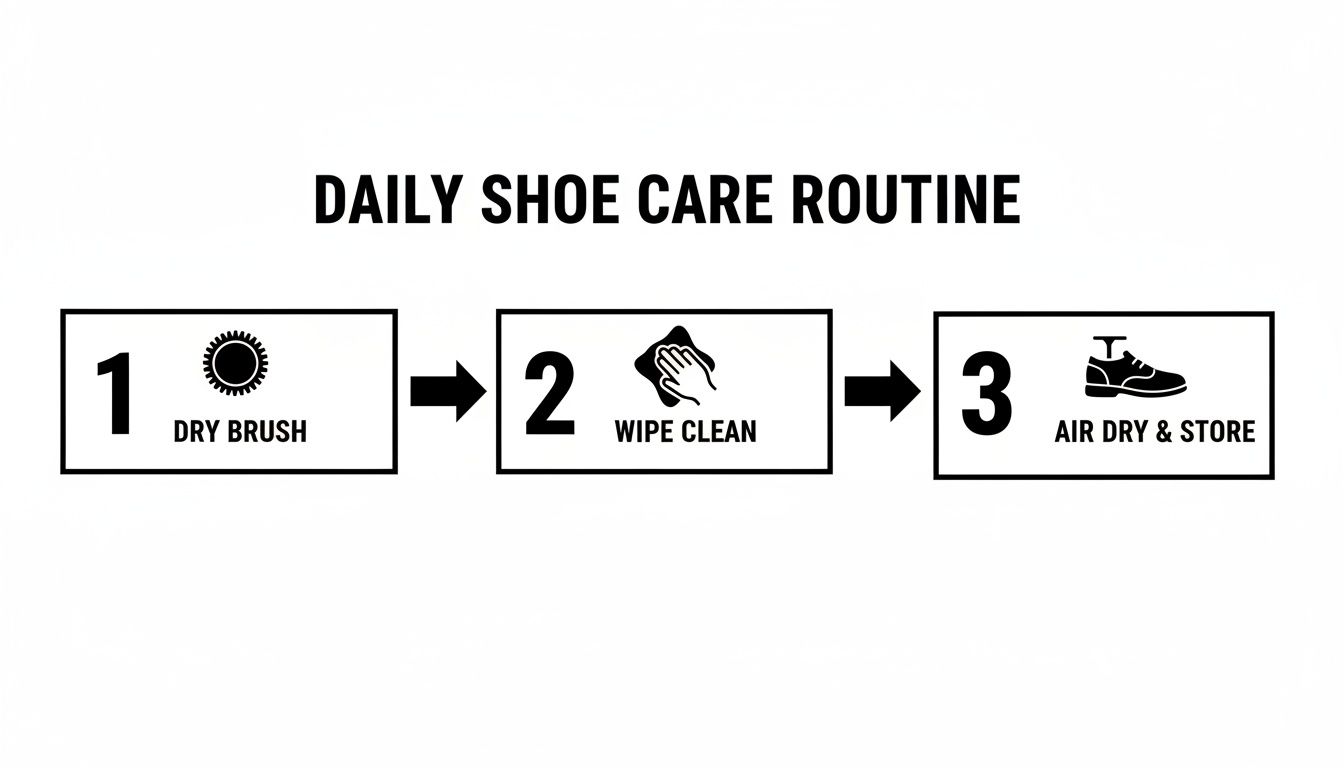
As illustrated, beginning with a dry brush before proceeding to a wet clean is the most effective sequence for removing soil.
Dip only the tips of your brush's bristles into the foam—avoid soaking the brush—and begin scrubbing. Work in small, manageable sections to prevent the solution from drying prematurely.
- For flat sole and midsole surfaces: Use consistent, circular motions to lift dirt evenly and prevent streaking.
- For deep grooves and textured patterns: Employ a firm, back-and-forth motion to ensure the bristles penetrate all recessed areas.
A common error is to continue using a soiled brush, which merely redistributes dirt. Rinse your brush frequently in clean water before reapplying foam. Immediately after cleaning a section, wipe the dirty suds away with a clean microfiber towel.
The appropriate method depends on the severity of the soiling. This table outlines our recommended approaches.
Choosing Your Cleaning Method
| Soiling Level | Recommended Method | Tools Required | Estimated Time |
|---|---|---|---|
| Light | Quick Wipe-Down | Microfiber towel, water/mild soap | 2-5 minutes |
| Moderate | Basic Wet Scrub | Bowl, medium brush, shoe cleaner | 10-15 minutes |
| Heavy | Deep Restoration (as described) | Multiple brushes, shoe cleaner, towel | 20-30 minutes |
| Stained/Yellowed | Targeted Whitening | Specialty whitening products, detail brush | 30+ minutes (plus drying) |
Matching your methodology to the condition of the sole saves time and ensures the appropriate application of tools and effort.
The Critical Importance of Proper Drying
Once the entire sole is clean, use a fresh, damp microfiber towel for a final wipe-down. This removes any residual cleaning solution that could attract dirt.
Now for the most critical step: drying. Place the shoes in an area with good air circulation, away from direct sunlight and heat sources like radiators or vents. Exposing the rubber to high heat can cause it to warp, become brittle, or even delaminate from the upper. Patience is essential. Allow the footwear to air dry completely and naturally; this is the only way to preserve its structural integrity.
Targeting Scuffs, Stains, and Chemical Yellowing
In some cases, a standard deep clean is insufficient. After removing surface grime, you may be left with localized issues: scuff marks, deep-set stains, or oxidation-induced yellowing. These require specific, targeted treatments.
For common scuff marks—streaks of transferred color or material from contact with other surfaces—the key is focused friction. A general scrub will only spread the mark. Instead, apply a small amount of concentrated cleaning solution directly onto the scuff. Then, using a stiff-bristle brush, work the area in tight, circular motions. This direct pressure helps break down and lift the transferred material without affecting the surrounding sole.
For more advanced techniques, you can learn how to remove scuffs from shoes in our dedicated guide.
Addressing Deep-Set Stains
Stains from organic matter (grass, mud) or oil-based substances present a different challenge. Their pigments can penetrate the porous rubber, making them difficult to remove. For these, patience is more effective than pressure. Apply your cleaning solution directly to the stain and allow it to dwell for several minutes. This gives the formula time to penetrate the material and break down the staining agent's chemical bonds before you begin scrubbing.
Field-Tested Advice: Before applying any new treatment, always perform a spot test on an inconspicuous area of the sole, such as the arch. This precautionary step ensures the product will not cause discoloration or adverse textural changes on a visible portion of the shoe.
In some contexts, disinfection may be as important as cleaning. While professional chemical decontamination is a complex science, a simple at-home principle can be effective. Many consumer disinfecting wipes are rated to kill 99.9% of bacteria, but this efficacy is contingent on the surface remaining visibly wet for the manufacturer's specified contact time, often around four minutes. This principle applies equally to rubber shoe soles.
Reversing Oxidation and Yellowing
The most formidable challenge is reversing yellowing caused by oxidation. This is a chemical change within the rubber, not a surface stain. Attempting to treat it with aggressive scrubbing or harsh chemicals like bleach is a critical error that will accelerate material degradation and can cause permanent damage.
The only safe and effective method for correcting yellowed soles is to use a dedicated sole brightening product. These are specialized chemical formulas designed to reverse the oxidation process. The product is applied to the soles, which are then exposed to UV light (either from direct sunlight or a dedicated UV lamp). This initiates a controlled chemical reaction that restores the sole's original white or translucent appearance.
This precise technique is the standard among professionals for restoring vintage and discolored footwear. When standard cleaning methods fail, this is the correct procedure for reversing chemical aging.
Proactive Sole Protection and Maintenance
You have now restored your soles. The next phase is preservation. Effective footwear care is proactive, shifting the focus from reactive cleaning to preventative maintenance.
Your primary defense is a high-quality footwear protector spray. This is a non-negotiable step. These formulations create a hydrophobic and oleophobic barrier on the rubber's surface. This invisible shield causes water, dirt, and oils to bead up and roll off rather than being absorbed and causing stains.
To apply, hold the can approximately six inches from the sole and spray a light, even coat. Avoid saturation. Allow the shoes to air dry completely for several hours before wearing. This single application will dramatically simplify future cleaning efforts.
The Role of Storage and Strategic Habits
The storage environment for your footwear has a significant impact on its longevity, particularly for white or light-colored soles. The primary antagonist is ultraviolet radiation from sunlight, which, as discussed, is the main catalyst for oxidative yellowing.
Always store footwear in a cool, dry location away from direct sunlight. A closet or a shoe rack not positioned in front of a window is ideal. This practice not only mitigates UV-driven yellowing but also prevents heat exposure that can degrade the rubber and weaken the adhesives bonding the sole to the upper. For a more detailed analysis, see our guide on how to keep white sneakers white.
Expert Takeaway: Proactive care is always more effective than reactive cleaning. A few minutes of prevention after each wear saves hours of intensive scrubbing down the line and extends the life of your footwear.
This principle is a consensus among footwear care professionals. The standard protocol is to remove heavy debris immediately, perform a quick dry-brushing weekly, and use targeted cleaners for spot treatments. Adherence to these simple routines can reduce the frequency of intensive deep cleanings by an estimated 30–50% annually. You can discover more professional advice on preventative shoe care on Paul-Green.com.
Frequently Asked Questions
We receive numerous technical inquiries from both collectors and casual wearers. Below are our answers to the most common questions.
Is a Magic Eraser a Viable Cleaning Tool?
It is not recommended.
A "magic eraser" is a melamine foam, which functions as an extremely fine-grit abrasive. It cleans by physically sanding away a micro-layer of the sole's surface. While it may appear effective initially, it permanently alters and damages the rubber's original texture and finish.
It is a shortcut that causes irreversible material damage and should be avoided in favor of proper cleaning methods.
Can Shoes Be Cleaned in a Washing Machine?
Under no circumstances. Placing footwear in a washing machine is a highly destructive act. The combination of high heat, water saturation, and mechanical tumbling action will degrade the adhesives that bond the shoe's components.
This will almost certainly cause sole separation, warp the rubber, and destroy the shoe's structural integrity. The risk of catastrophic failure is too high.
What is the Recommended Frequency for Deep Cleaning Soles?
For a pair in regular rotation (worn multiple times per week), a comprehensive deep clean every 4-6 weeks is a sound maintenance schedule. This prevents the accumulation of deeply embedded grime, which becomes exponentially more difficult to remove over time.
For a reliable, material-safe clean across your entire collection, we recommend the Gold Standard premium shoe care system. Explore the full collection on our website to see the professional difference.