
Scuffs are an inevitable consequence of wearing your footwear, but they don’t have to be permanent. The key to effective scuff removal lies in a methodical approach: identify the material, assess the damage, and apply the correct technique. This guide moves beyond generic advice, offering field-tested methods for specific materials, from full-grain leather and delicate suede to modern knits and rubber compounds.
Your Foundational Strategy for Scuff Removal
Before reaching for an all-purpose cleaner, pause. There is no universal solution for scuffs, and applying the wrong method can escalate a minor mark into irreversible damage. Our philosophy is rooted in precision and material science—our goal is to not only remove scuffs but to preserve the integrity and extend the lifespan of your footwear.
This focus on proper maintenance reflects a wider trend. The global shoe care market, valued at approximately USD 4.7–4.9 billion in recent years, continues to expand. This growth underscores a significant demand for effective, material-safe care solutions.
The Initial Assessment
Every successful repair begins with an accurate diagnosis. You must understand the nature of both the material and the blemish. Is it a simple color transfer from incidental contact, or is it a deeper abrasion where the material’s surface has been compromised?
Follow this diagnostic framework:
- Material Identification: Is the upper constructed from smooth leather, patent leather, suede, nubuck, canvas, or a synthetic knit? Each material possesses unique properties and tolerances.
- Damage Analysis: Is the scuff a superficial smudge, or is it a physical gouge that has altered the texture? A light mark on a rubber midsole requires a different intervention than a scratch on patent leather.
- Tool Selection: Utilizing the appropriate tools is not optional. A dedicated care kit ensures you are equipped to address common scuffs without causing secondary damage.
At Gold Standard, we have observed that the most common mistake is impatience—specifically, the immediate application of an aggressive, non-specific cleaner. We maintain that professional-grade results are achieved through expert knowledge and a deliberate process. A methodical technique will always yield a superior outcome.
This initial assessment dictates the entire treatment plan. To streamline this process, consult the following overview.
Quick Scuff Diagnosis and Treatment Overview
Use this table to quickly identify your shoe's material and the recommended first step for treating common scuffs.
| Shoe Material | Common Scuff Type | Recommended First Step | Essential Tools |
|---|---|---|---|
| Smooth Leather | Light surface scuffs, color transfer | Gently wipe with a soft, damp cloth | Microfiber cloth, gentle cleaner |
| Patent Leather | Black streaks, minor abrasions | Spot treat with a small amount of oil or specialized cleaner | Cotton swab, soft polishing cloth |
| Suede/Nubuck | Dry dirt, flattened nap | Gently brush with a suede-specific brush | Suede brush, suede eraser |
| Rubber Soles | Dark scuffs, embedded dirt | Use a targeted eraser or cleaning solution on a brush | Midsole cleaner, stiff-bristle brush |
| Canvas/Knit | Surface dirt, smudges | Spot clean with a mild, well-diluted cleaning solution | Soft brush, clean cloth, solution |
This diagnostic table reinforces a core principle: the optimal repair is always tailored to the specific material and blemish.
This flowchart maps out that core decision-making process, guiding you from identifying the material to picking the right treatment.
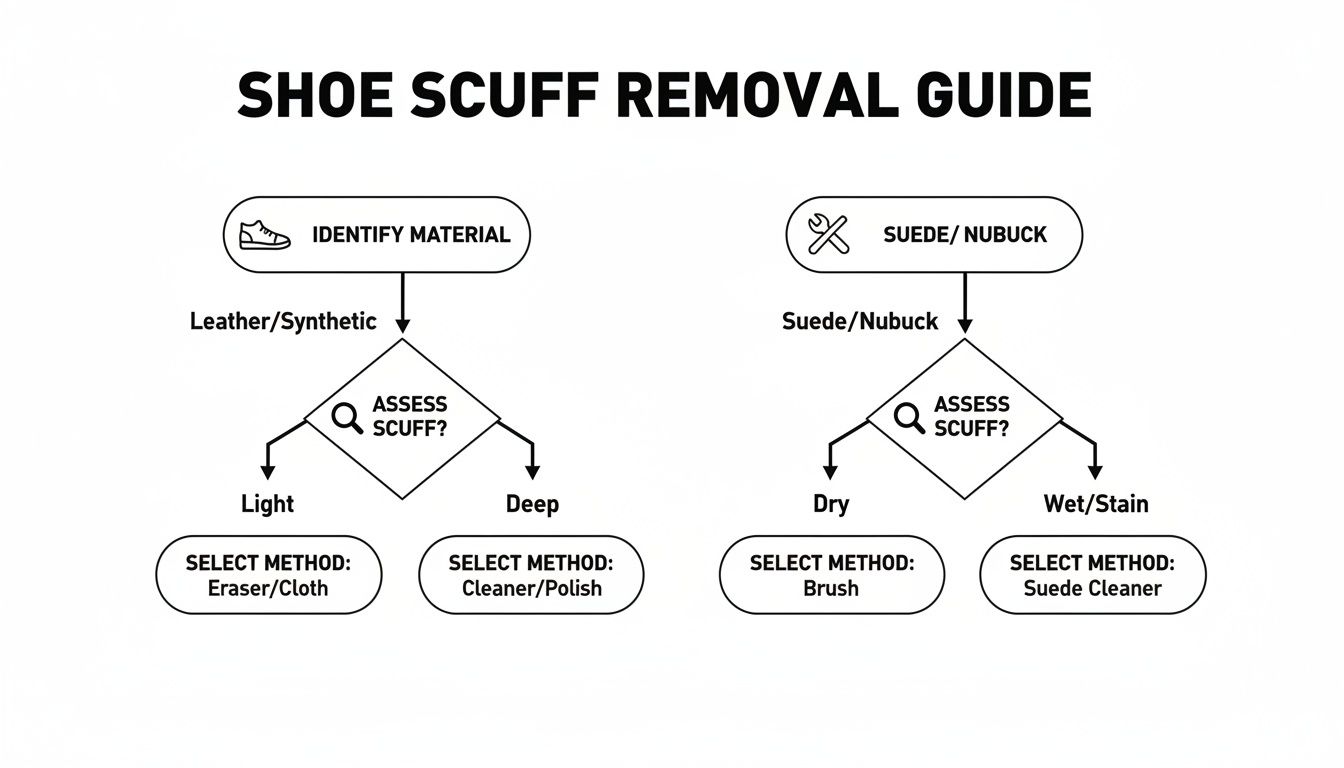
As the chart illustrates, a successful outcome depends on matching the technique to the material. To assemble a proper toolkit, consult our guide on the best sneaker cleaning kit.
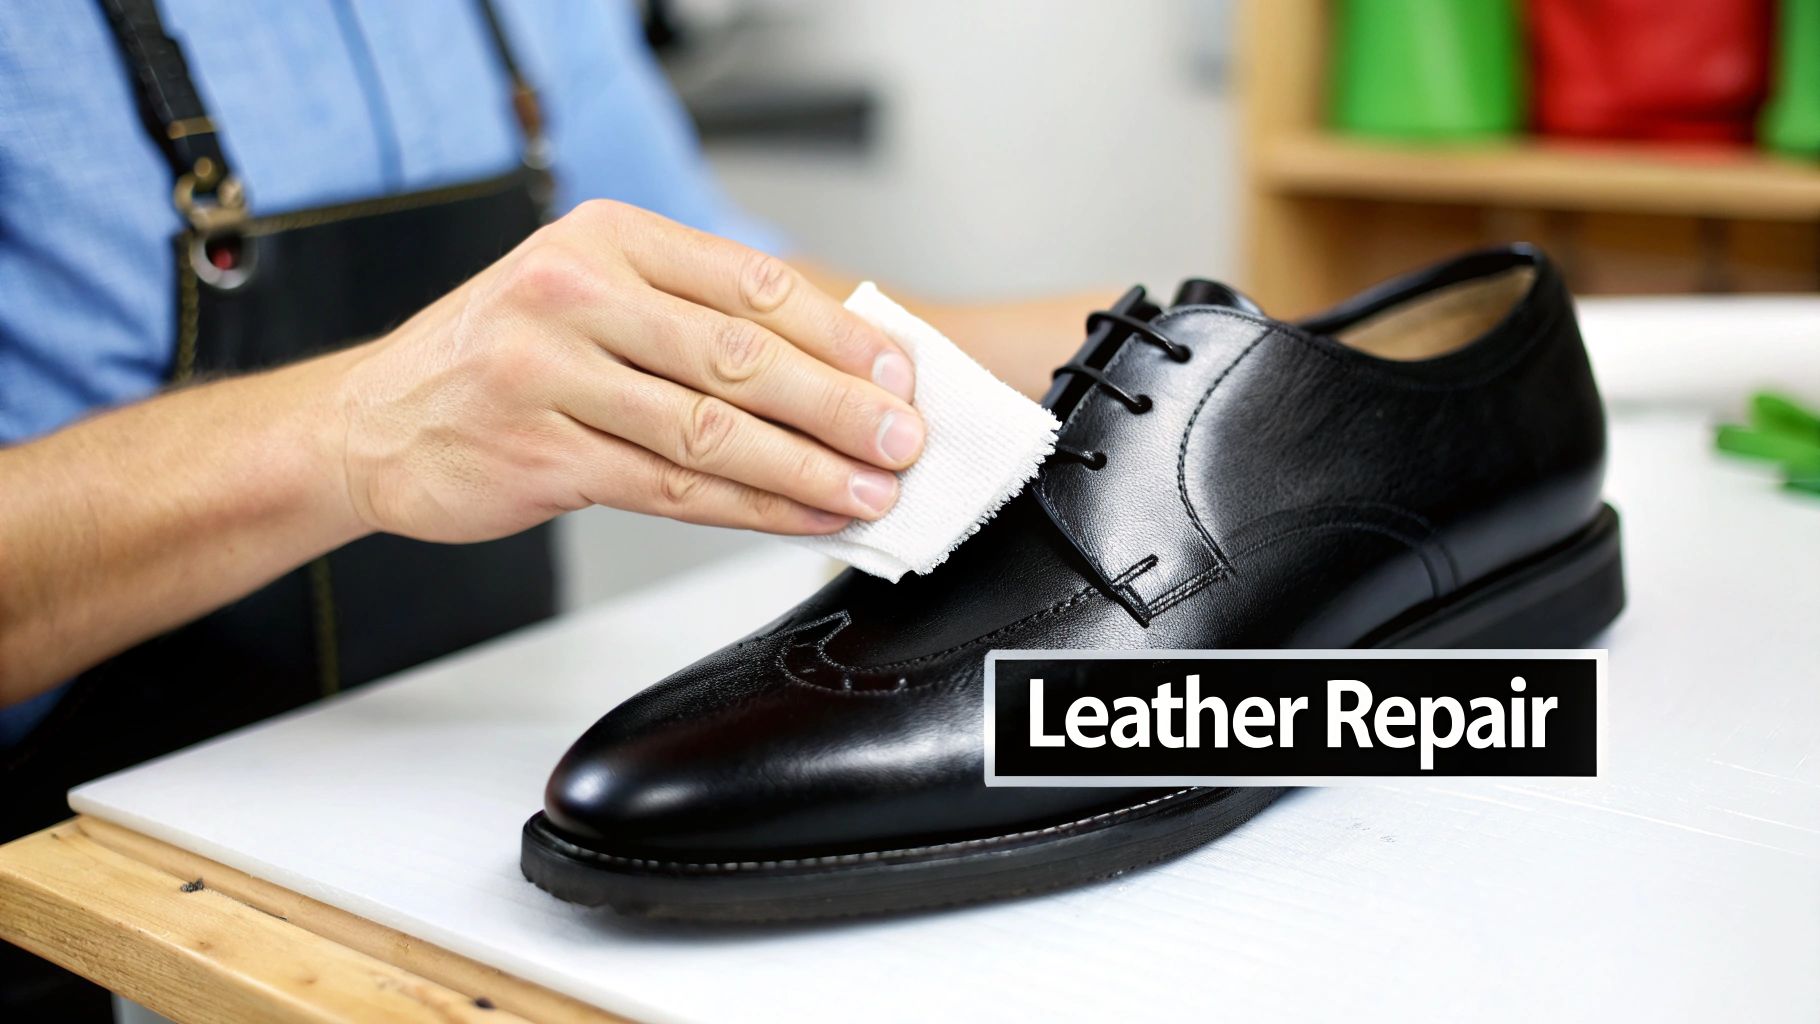
Addressing Scuffs on Smooth and Patent Leather
Leather is prized for its durability and aesthetic appeal, but its finished surface is susceptible to scuffs and abrasions. The key to a successful repair is differentiating between a simple color transfer—where pigment from another object has been deposited onto the shoe—and a true abrasion that has physically damaged the leather's surface.
Applying a harsh cleaner is the fastest way to transform a minor scuff into a large, discolored patch. Always begin by cleaning the affected area to remove surface contaminants. A pH-neutral cleaner applied with a soft microfiber cloth will lift away grime without stripping the leather’s essential oils. This preparation ensures you are treating the scuff itself, not grinding dirt deeper into the material.
The Correct Method for Polishing Smooth Leather
Once the shoe is clean and completely dry, focus on the scuff. For smooth leather, this typically involves applying a color-matched cream polish to recondition the area and restore pigmentation. This is not merely cosmetic; it is a restorative process designed to blend the repair seamlessly.
Execute the process as follows:
- Apply Polish Sparingly: Use a dauber or a clean cloth to apply a minimal amount of cream polish directly onto the scuff.
- Work into the Leather: Gently massage the polish into the leather using small, circular motions. This allows the pigment to penetrate minor nicks and scrapes.
- Feather the Edges: Blend the polish outward from the center of the scuff, feathering the edges into the surrounding, undamaged leather. This technique prevents a noticeable, patchy repair.
- Buff to a Finish: Allow the polish to dry for several minutes. Then, using a clean horsehair brush, buff the entire area to remove excess polish and achieve a uniform, natural luster.
Material knowledge is paramount to proper care. Unsurprisingly, leather footwear is the primary driver for creams and polishes, with the formal shoe care sector accounting for approximately 30–40% of the industry's revenue. This demonstrates the high demand for effective leather scuff repair methods.
Maintaining High-Gloss Patent Leather
Patent leather requires a different approach. Its signature high-gloss polyurethane or acrylic coating can be permanently dulled by improper products. The objective is to remove the mark without compromising the mirror-like finish.
For minor scuffs, a dedicated patent leather cleaner or a small amount of mineral oil on a cotton swab is typically sufficient. Gently rub the scuff until it disappears, then buff the entire shoe with a soft, clean cloth to restore an even gloss. Avoid pigmented polishes unless absolutely necessary, as they are difficult to apply without streaking on such a non-porous surface.
Expert Tip: Never use rubbing alcohol or acetone-based products on patent leather. While they will remove the scuff, they will also dissolve the glossy topcoat, causing permanent chemical damage. Patience and specialized products are essential.
Understanding how different materials affect durability, value, and care is critical for preserving high-end footwear. If a scuff appears more like a deep-set stain, a different strategy may be required. For targeted treatments, see our guide on how to remove shoe stains. This level of detailed care not only removes unsightly marks but also protects the material, ensuring your footwear maintains its value and appearance for years.
Reviving Suede and Nubuck Without Damage
The luxurious, velvety texture of suede and nubuck is a result of their delicate, raised-fiber surface, known as the nap. Approaching a scuff on these materials with an incorrect method can lead to permanent damage, such as shiny patches (crocking), discoloration, or a flattened nap that cannot be restored.
Before beginning, it is crucial to understand that a "scuff" on suede is rarely a simple color transfer. More often, it is an area where the fine fibers have been compressed, matted down, or embedded with dirt. The objective is not to scrub the mark away, but to gently lift debris and restore the nap to its original, upright position.
The Cardinal Rule: Work Dry
This is the single most critical principle: ensure the footwear is completely dry before beginning any treatment. Introducing moisture at this stage will convert dry particulate into mud, setting the stain deeper into the fibers and rendering it nearly impossible to remove.
Once you have confirmed the shoe is dry, assemble your tools: a quality suede eraser and a dedicated suede brush. For more stubborn marks, a specialized cleaning block like the Jonny Seww Amazing Cleaning Block can be highly effective.
Begin with the eraser. Apply gentle, direct pressure to the scuff, working in a single direction as if erasing a pencil mark. This controlled friction is sufficient to crumble and lift the compacted dirt embedded in the nap.
Mastering Brushing Technique
After using the eraser, the next step is to restore the material’s texture with a suede brush. A high-quality brush will feature both nylon and brass bristles; knowing when and how to use them is essential.
Brushing motions should be light and controlled. The goal is to re-fluff the fibers, not to scour the surface.
- For generally matted areas, use soft, circular motions. This lifts the fibers from multiple directions, helping to separate them and restore a uniform, soft appearance.
- For stubborn, directional scuffs, switch to short, back-and-forth strokes. This action works against the grain of the nap, encouraging the fibers to stand upright.
The key is finesse, not force. You are coaxing the fibers back to their original state. Aggressive brushing will abrade the suede, creating a shiny, bald patch that is far more conspicuous than the original scuff.
Addressing Stubborn Marks and Stains
If the dry method proves insufficient, you may consider a liquid cleaner, but only with extreme caution. Always use a cleaner specifically formulated for suede and nubuck to avoid causing water spots or discoloration.
If a liquid cleaner is necessary, follow these steps precisely:
- Apply a very small amount of cleaner onto a soft-bristle brush, never directly onto the shoe.
- Gently agitate the cleaner into a light foam, focusing only on the stained area.
- Use a clean, slightly damp microfiber cloth to lightly blot and lift the foam. Do not saturate the material.
- Allow the shoe to air dry completely, away from direct heat or sunlight. Stuffing the shoe with paper can help it maintain its shape.
- Once fully dry, use your suede brush for a final pass to restore the nap.
This patient, methodical process is the only safe way to remove scuffs from suede and nubuck shoes. By respecting the delicate nature of the material, you can restore even well-worn pairs to excellent condition.
Cleaning Scuffs from Canvas and Knit Uppers
Unlike leather or suede, modern materials like canvas and knit fabrics operate under a different set of principles. A "scuff" on these textiles is almost never damage to the fibers themselves. Instead, it is typically surface-level dirt, grime, or a rubber mark transferred from another object.
Therefore, the objective is not abrasion or polishing, but careful, controlled cleaning. The woven texture of these materials makes them vulnerable to pilling, fraying, or snagging if treated too aggressively. This constitutes permanent damage. The correct process involves lifting marks without disturbing the underlying fabric.
The Preliminary Dry Pass
Before any liquid is introduced, a thorough dry brushing is a non-negotiable first step. This removes loose dust and surface debris that would otherwise mix with a cleaning solution to form mud, creating a more significant stain.
Use a soft-bristle brush for this task. A stiffer brush, such as one designed for midsoles, is too abrasive and can easily snag the delicate loops of a knit upper or fray canvas threads. Employ gentle, short strokes across the entire shoe, focusing on the scuff to dislodge any clinging particles.
Formulating the Correct Cleaning Solution
Once dry debris has been removed, you can proceed with wet cleaning. The key is a gentle, well-diluted solution that cleans effectively without over-saturating the fabric, which can lead to watermarks.
We recommend a high-quality, pH-neutral cleaner formulated for footwear. This ensures you avoid harsh chemicals that could weaken fabric integrity or cause discoloration.
- Solution Ratio: Mix a small amount of cleaner with lukewarm water. A 1:5 ratio (one part cleaner to five parts water) is an effective starting point, providing sufficient cleaning power without being overly concentrated.
- Application Method: Dip your soft-bristle brush into the solution, then tap it against the side of the container to remove excess liquid. The brush should be damp, not dripping.
A common error is applying cleaning solution directly to the shoe. This floods the area, eliminates control, and virtually guarantees a water stain. Always apply the solution via the brush for precision.
Gently work the solution into the scuff using small, circular motions. A light foam will form as the cleaner lifts the grime from the fabric. Be methodical but gentle; let the foam and soft bristles do the work, not brute force. Once the stain is agitated, use a clean, damp microfiber towel to blot the area and lift away the soiled foam.
Special Considerations for White Canvas
The primary challenge with white canvas is yellowing. This typically occurs for two reasons: residual cleaning solution was left in the fabric and oxidized upon exposure to UV light, or a harsh, bleach-based cleaner was used.
To prevent this, ensure you thoroughly blot the cleaned area with your damp microfiber towel to extract all traces of the solution. For drying, stuff the shoes with white paper towels (never newspaper, as the ink can transfer) to absorb internal moisture and help them maintain their shape.
Crucially, never place canvas or knit sneakers in direct sunlight or near a heat source to accelerate drying. This is the leading cause of yellowing and can also shrink or warp the fabric. Allow them to air dry in a well-ventilated area. Patience is the final, essential component for achieving a clean, uniform finish.
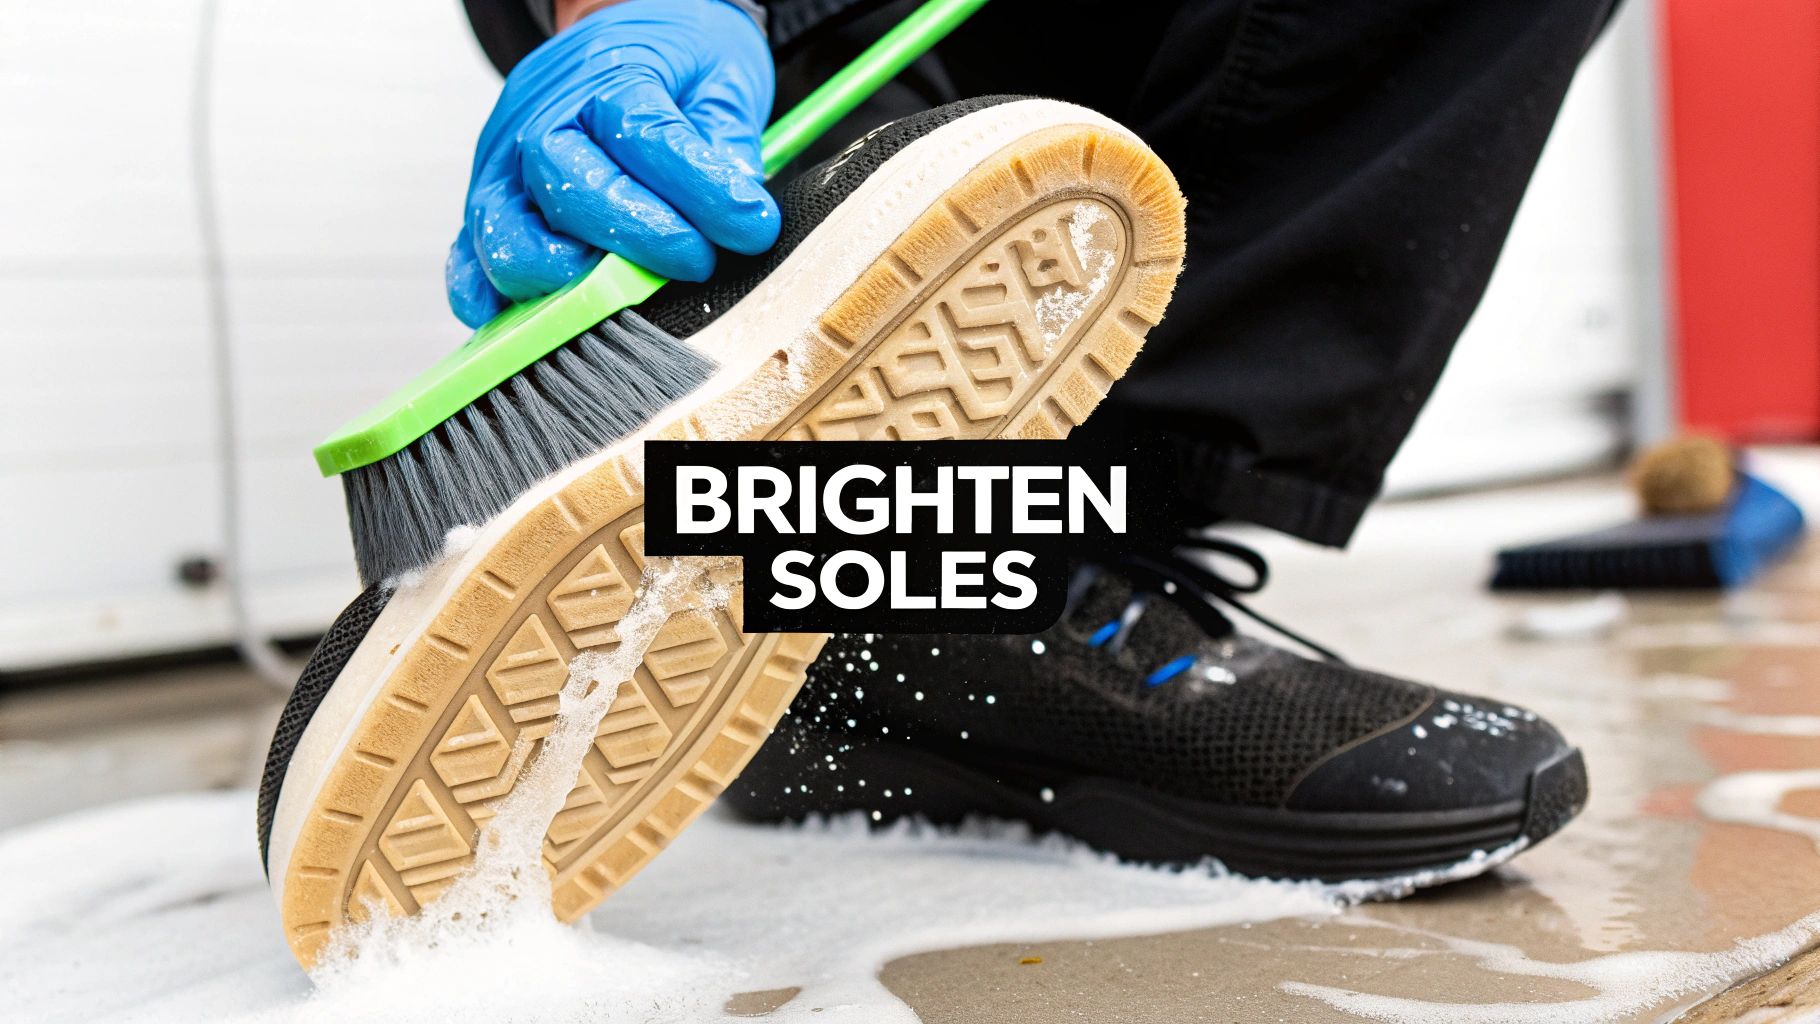
How to Erase Marks from Rubber Midsoles
The rubber midsole is a high-impact area, constantly subjected to abrasion from curbs, stairs, and daily friction. It is a magnet for scuffs, which can make an otherwise clean pair of sneakers appear worn and neglected.
While rubber is a resilient material, restoring it to a factory-fresh appearance requires a specific methodology. Many common household remedies can cause more harm than good over the long term.
Debunking Common Midsole Cleaning Myths
We have all seen the recommendations: toothpaste, baking soda, melamine sponges. While these may offer a temporary fix for light marks, they pose a risk to the material’s longevity.
Many of these household items are abrasive or contain chemicals that can degrade rubber over time, leading to premature yellowing, drying, and cracking. While a melamine sponge might lift a scuff in one to three gentle passes, and a pencil eraser can be effective on suede in under a minute, these are not robust solutions for deep-set scuffs. For more insight, you can review data on the effectiveness of shoe care products on Technavio.com.
The objective is not merely to clean today’s scuff, but to preserve the rubber for the entire lifespan of the shoe. We always advocate for a dedicated sole cleaner, which is formulated to be tough on contaminants but gentle on the material itself.
The Professional Method for Midsole Restoration
To achieve professional-grade results, you need the right tools and technique. A dedicated sole cleaner works on a chemical level to break down and dissolve dirt and scuff marks, rather than simply abrading them away. This is crucial for preserving the rubber's original texture and color.
Pair your cleaner with a stiff-bristle brush. The firm bristles are essential for forcing the cleaning solution deep into the textured patterns and crevices common on most midsoles, where dirt becomes trapped.
Follow this field-tested process:
- Load the brush. Apply a small amount of the Gold Standard Sole Cleaner directly onto the bristles.
- Begin scrubbing. Address the scuffed areas with firm, circular motions. You will see a foam develop as the cleaner lifts the grime from the rubber.
- Work in sections. Do not attempt to clean the entire midsole at once. Focus on one small area at a time to prevent the cleaner from drying before it can be wiped away.
- Wipe and inspect. Use a clean microfiber towel to wipe away the foam and dissolved dirt. Assess the result. For stubborn marks, repeat the process.
This methodical approach ensures you are extracting the scuff from the rubber, not just smearing it. It is highly effective against persistent black asphalt marks and deep-set grass stains.
Extending the Life of Your Clean Soles
Once your midsoles are restored, you can take preventative measures.
Applying a high-quality sneaker protector spray creates an invisible barrier over the rubber. This hydrophobic layer helps repel dirt and moisture, meaning new scuffs will not set as easily and will be simpler to remove.
Incorporating a quick wipe-down of your soles after each wear also prevents the accumulation of dirt, reducing the need for intensive cleaning sessions. This minor habit yields significant long-term benefits.
Proactive Care: Scuff Prevention Strategies
While knowing how to remove a scuff is a valuable skill, the superior strategy is to prevent it from occurring. Transitioning from a reactive (damage repair) to a proactive (preservation) mindset will save time and, more importantly, maintain the structural integrity and value of your footwear. Prevention is the cornerstone of expert-level care.
The single most effective preventative measure is to establish a barrier between your shoes and the elements. Dirt, grime, and moisture are the primary agents of abrasive scuffs. A top-tier protective spray functions as an invisible shield, preventing these contaminants from making direct contact with the shoe's materials.
Expert Application of a Protective Barrier
A casual application will not suffice. The goal is to create a uniform, consistent coat that cures into a durable, hydrophobic layer. Rushing this process can result in patchy protection or a sticky residue.
Follow this method for a flawless application:
- Begin with a clean surface. This is non-negotiable. Apply protector only to new or freshly cleaned footwear that is 100% dry.
- Maintain proper distance. Hold the can approximately 6-8 inches from the shoe. Any closer will oversaturate the material; any farther will result in ineffective misting.
- Apply light, even coats. Use a smooth, sweeping motion to cover the entire shoe. Allow the first coat to dry for at least 30 minutes before applying a second. Two thin coats provide far superior coverage and durability than one heavy coat.
- Allow for a full cure. This is the most frequently skipped step. Let the shoes rest in a well-ventilated area for a full 24 hours before wearing. This allows the barrier to fully bond with the material at a molecular level.
The principle is analogous to waxing a car. You apply thin, even layers and allow them to set properly for a durable finish. A protector spray operates on the same principle: methodical application is key.
Integrating Scuff-Proof Habits into Your Routine
Beyond products, daily habits have a significant impact. How you wear, and especially how you store, your shoes can determine whether they look pristine for years or become damaged in months.
Incorporate these small adjustments:
- Utilize Shoe Trees: Quality cedar shoe trees are essential. They help footwear maintain its shape, draw out damaging moisture, and prevent the deep creases that weaken materials and make them more susceptible to scuffing.
- Practice Smart Storage: When not in use, keep your shoes in their original box or a dust bag. This protects them from accidental impacts in a closet and shields them from dust and light.
- Be Mindful of Your Environment: This may seem obvious, but consciously avoid dragging your feet on abrasive surfaces like rough concrete or gravel. When seated, avoid kicking the legs of desks or chairs.
These proactive strategies—from using a premium sneaker protector spray to practicing mindful habits—form the foundation of any serious shoe care regimen. They are your best defense against daily wear and tear, ensuring your footwear remains in pristine, scuff-free condition.
Frequently Asked Questions About Shoe Scuffs
Even with a detailed guide, specific questions can arise. We have compiled answers to the most common inquiries we receive, designed to address challenging situations and build your confidence in footwear care.
Can I Use a Melamine Sponge (Magic Eraser) on My Shoes?
Exercise extreme caution. While a melamine sponge can be effective on durable, white rubber midsoles, it is a high-risk tool for nearly any other shoe material. A melamine sponge is not a cleaner; it is a micro-abrasive, functioning like extremely fine-grit sandpaper to physically sand away the scuff.
This abrasive action can cause irreversible damage:
- Finished Leather: It will strip the color and protective topcoat, leaving a dull, faded patch.
- Patent Leather: It will instantly abrade the high-gloss finish, creating a cloudy, hazy spot that cannot be polished out.
- Suede and Nubuck: This is the worst-case scenario. It will tear the delicate nap, creating a bald patch and permanently ruining the texture.
If you must use one, test it on a hidden area first. However, it should be considered a last resort and used only on solid white rubber.
What Is the Difference Between a Scuff and a Scratch?
Understanding this distinction is critical, as it dictates the entire repair strategy.
A scuff is a surface-level issue. It is typically a color transfer from another object or a light abrasion that has disturbed the texture without penetrating the material. In most cases, a scuff can be resolved through targeted cleaning, brushing, or polishing.
A scratch, by contrast, is a physical incision. The material itself has been cut, gouged, or torn. This is structural damage. While minor scratches can sometimes be minimized, deep scratches often require professional repair involving fillers and precise color matching.
A simple rule to remember: You clean a scuff, but you fill a scratch.
How Do I Remove Scuffs from White Leather Sneakers?
White leather is prone to scuffs, but they are manageable with the correct process. First, clean the entire sneaker with a gentle, pH-neutral cleaner on a microfiber towel to remove all surface dirt. Be gentle; aggressive scrubbing can worsen the appearance of an abrasion.
If the scuff remains after cleaning, it indicates that some of the white pigment has been abraded away. The next step is color restoration. Use a specialized white leather touch-up product or a high-quality white cream polish. With a small applicator or cotton swab, dab the product only onto the scuffed area. Gently feather the edges into the surrounding leather to create a seamless blend.
Under no circumstances should you use bleach. While tempting, bleach will cause the leather to yellow over time and will strip it of its natural oils, leading to premature drying and cracking. It creates far more problems than it solves.
At Gold Standard, we believe that material knowledge is the foundation of superior footwear care. When you combine our premium, material-safe solutions with proven techniques, you can address any scuff with professional confidence. Explore our full collection at https://gold-standard-approved.myshopify.com.