
A stain is a material science problem. The interaction between a foreign substance and the unique structure of your shoe’s material—be it the porous hide of leather, the delicate nap of suede, or the woven fibers of canvas—dictates the outcome. The foundational principle of professional footwear care is this: first, identify the material, then diagnose the stain, and only then select the appropriate tool and method. Applying the wrong solution or technique is the fastest way to turn a minor spot into irreversible damage.
A Proactive Approach to Shoe Stain Removal
Stains are an inevitable consequence of wearing your footwear. However, permanent damage is a choice. Effective stain removal is not about aggressive scrubbing or harsh chemicals; it is a calculated process based on an understanding of material science. An oil stain on suede requires a completely different chemical and mechanical approach than a mud stain on a rubber midsole.
This guide provides field-tested methodologies that respect the integrity of your footwear. Generic advice often fails to account for material-specific tolerances and can lead to discoloration, material degradation, or permanently setting the stain. In a market where 23.9 billion pairs of shoes are produced annually and the shoe care industry is projected to reach USD 6.43 billion by 2033, a precise, knowledge-based approach to maintenance is not a luxury—it is essential for preserving the value, appearance, and lifespan of your collection. You can dive deeper into the expanding shoe care industry for more context.
The Foundational Steps to Success
Before intervention, a proper diagnosis is critical. The most common error we observe is immediate, reactive cleaning with a generic product. This approach often results in faded color, damaged texture, or a stain that has been chemically bonded to the material.
This diagnostic framework illustrates the correct sequence of operations.
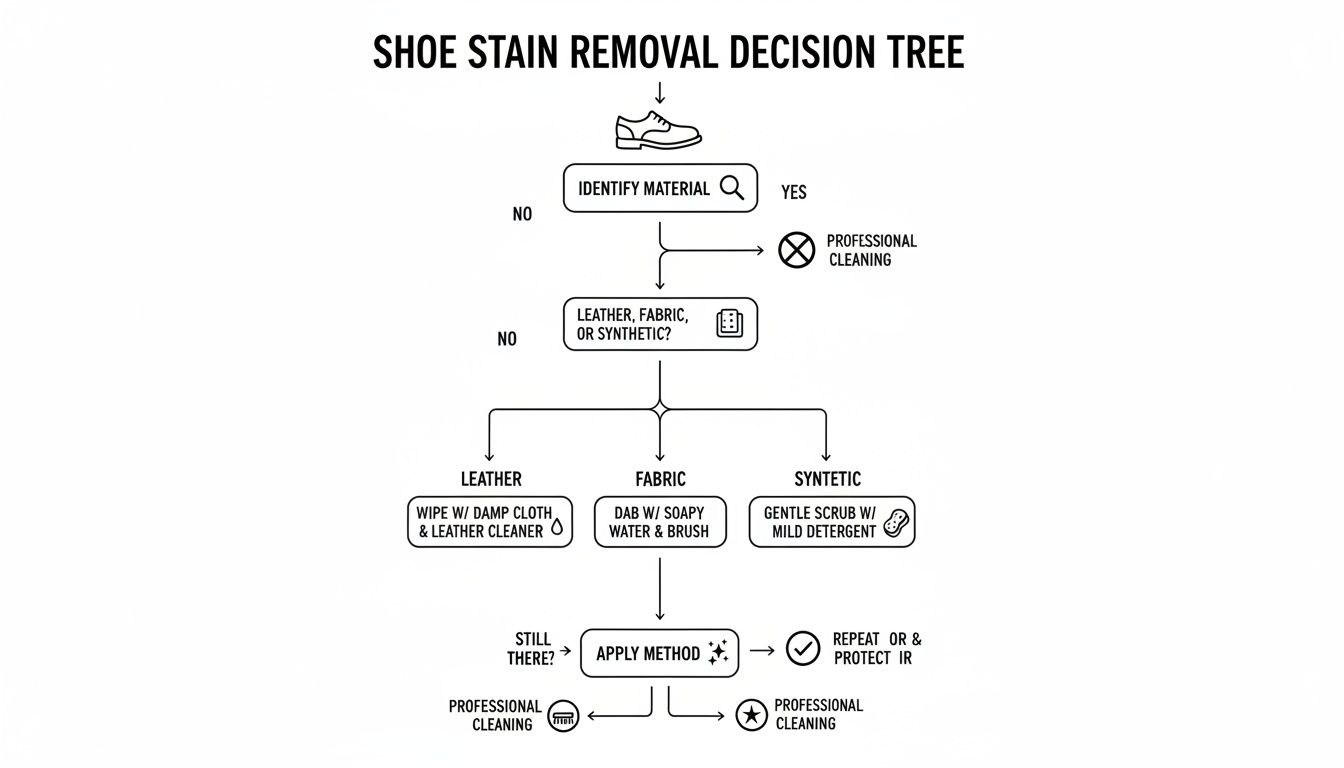
This process underscores a critical point: the cleaning method is the final step in a diagnostic process, determined entirely by the material composition and the nature of the stain.
What You Will Learn
This guide delivers specific, actionable protocols for a range of common scenarios, equipping you with the technical knowledge to address stains confidently and prevent iatrogenic damage.
- Material-Specific Techniques: Detailed instructions for leather, suede, nubuck, canvas, knit, and synthetic materials.
- Stain-Specific Strategies: Tactical methodologies for removing challenging substances like oil, ink, grass, and mud.
- Essential Toolkit Assembly: A breakdown of the professional-grade tools required for effective and safe stain removal.
At Gold Standard, we believe expert care begins with expert knowledge. By understanding the 'why' behind each technique, you transition from simply cleaning your footwear to actively preserving your investment.
Quick Stain Identification Guide
When a stain occurs, immediate and correct action is paramount. This reference table provides the optimal first response for common stains on various materials, serving as a field guide for rapid, effective intervention.
| Stain Type | Leather | Suede or Nubuck | Canvas or Mesh |
|---|---|---|---|
| Mud/Dirt | Wipe with a damp cloth; use a cleaner for residue. | Allow to dry completely. Brush away with a suede brush. | Use a soft brush and a mild, pH-balanced cleaning solution. |
| Oil/Grease | Apply cornstarch or talcum powder immediately to absorb. | Absorb with cornstarch; use a specialized suede eraser. | Blot with a clean cloth; treat with a mild detergent solution. |
| Ink | Dab with a cotton swab dipped in isopropyl alcohol. | Use a suede eraser or specialized ink remover for suede. | Blot carefully with isopropyl alcohol on a clean cloth. |
| Grass | Treat with a 1:1 vinegar and water solution. | Use a suede eraser; avoid liquid cleaners if possible. | Pre-treat with a stain remover or mild enzymatic cleaner. |
| Blood | Dab with a cold, damp cloth; use hydrogen peroxide sparingly. | Dab with hydrogen peroxide on a Q-tip. Spot test first. | Soak in cold water; apply a mild soap solution. |
This table serves as an initial triage guide. Subsequent sections will provide more detailed protocols for comprehensive treatment.
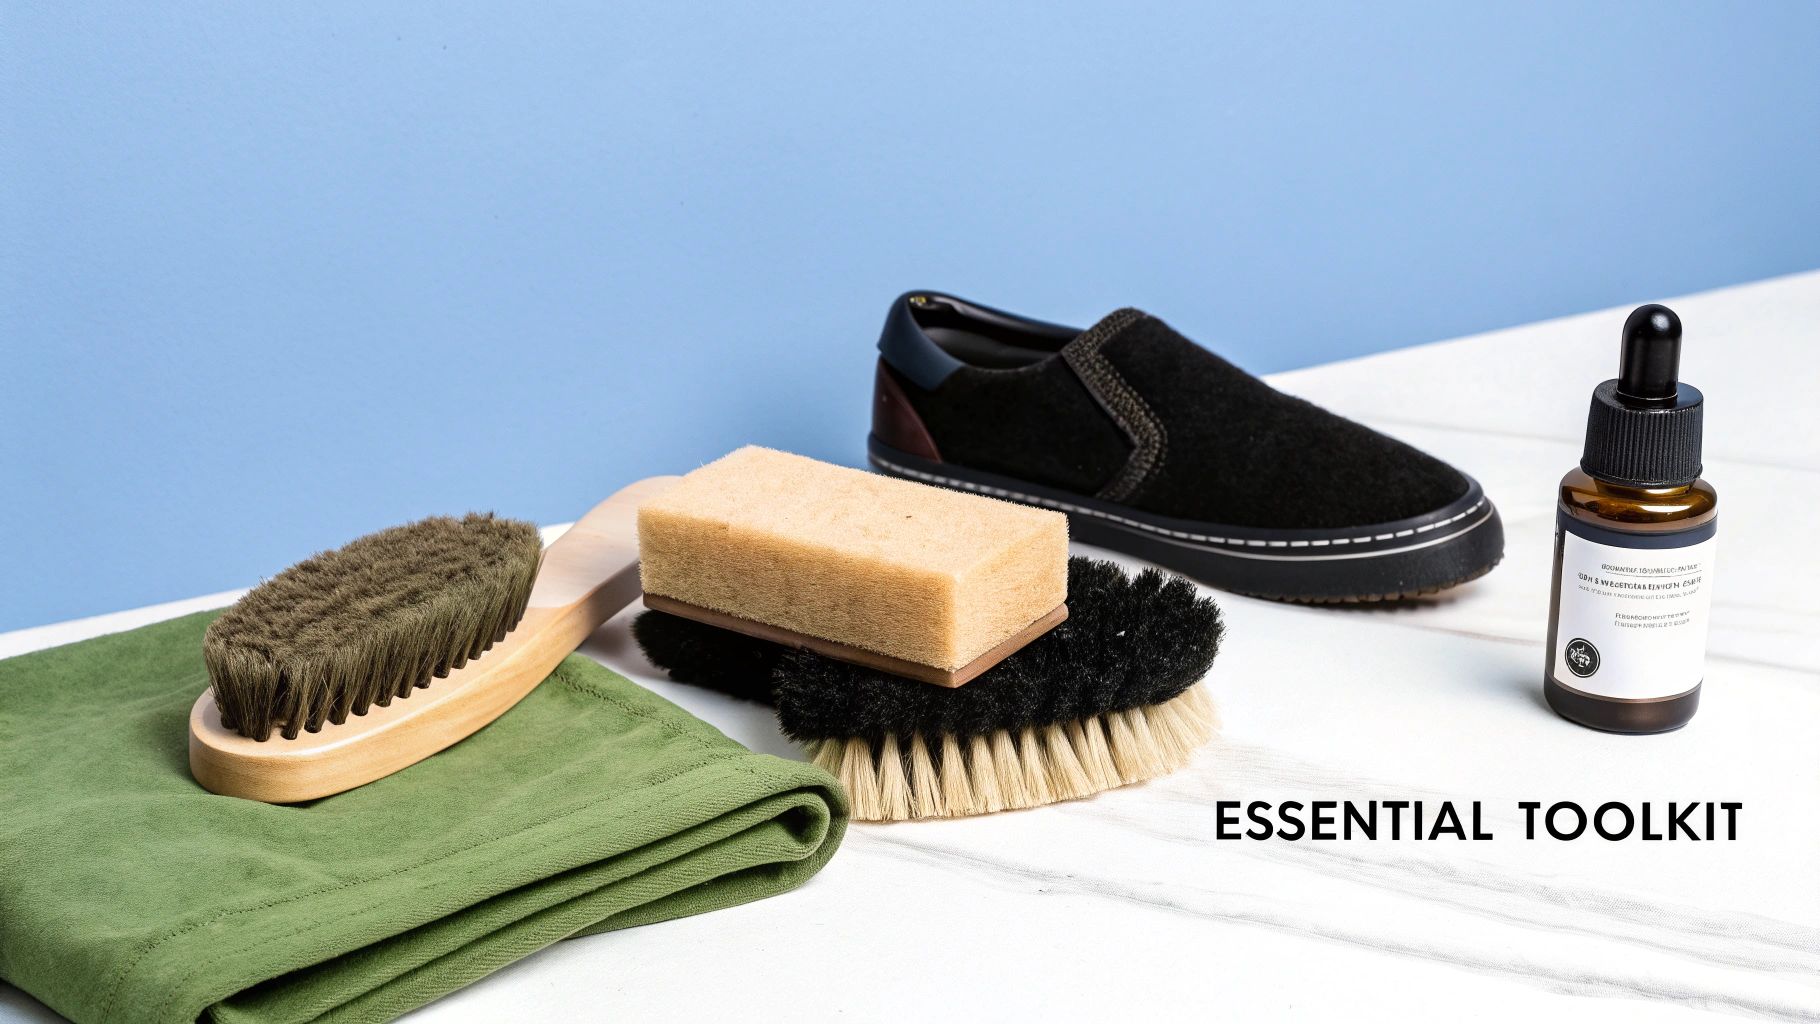
Assembling Your Professional Cleaning Toolkit
Your results are directly correlated to the quality of your tools. Attempting to clean premium footwear with an abrasive household brush and dish soap is a predictable path to material damage.
A professional toolkit is not about expense; it is about precision. Proper tools prevent damage, ensure efficiency, and restore footwear to its intended condition. Think of your kit as a set of surgical instruments: each one is designed for a specific task and material. Using a generic, all-purpose cleaner on premium suede or full-grain leather is a critical error.
The Core of Your Arsenal
A functional toolkit is built on a foundation of versatile, material-safe implements.
-
A Multi-Brush System: A single brush is insufficient. You require a soft horsehair brush for delicate leathers and polishing. A medium-bristle brush is necessary for general cleaning on durable materials like canvas. A stiff-bristle brush must be reserved exclusively for outsoles and midsoles; its use on uppers will cause micro-abrasions and permanent damage.
-
High-Quality Microfiber Towels: Paper towels and cotton rags are abrasive and leave lint deposits. A premium microfiber towel is non-abrasive, highly absorbent, and essential for blotting stains and drying surfaces without damaging the finish.
-
Suede & Nubuck Eraser: This is a non-negotiable tool for suede or nubuck care. It functions by gently crumbling and lifting dry contaminants—such as light dirt or water spots—from the material’s nap without the use of liquids, which can cause matting and discoloration.
Data shows that stains are the primary concern for footwear owners, with 70% of consumers citing it as their biggest maintenance challenge. Consequently, targeted stain removal products drive 30-40% of new purchases in the shoe care sector. This reflects a growing understanding that one-size-fits-all solutions are inadequate.
Beyond the Basics: The Cleaning Solution
With the right mechanical tools, the chemical component—your cleaning solution—becomes critical. A pH-balanced formula is essential. Such a solution is potent enough to break down dirt and stains but gentle enough to avoid stripping natural oils from leather or causing discoloration on synthetic fabrics.
For a comprehensive, professional-grade setup, a curated kit is the most efficient starting point. Our Gold Standard Premium Shoe Cleaner Kit provides the essential brushes, towel, and solution, ensuring you are properly equipped from the outset.
Having the right tools on hand transforms stain removal from a reactive panic into a controlled, confident process. Preparedness is what separates a minor cleanup from a major catastrophe.
A Material-Specific Guide to Stain Removal
Effective stain removal is contingent upon a deep respect for the material being treated. Each material—leather, suede, canvas—possesses a unique cellular or fibrous structure, porosity, and tolerance to moisture and abrasion. Applying a uniform cleaning method across different materials is a primary cause of footwear damage.
Let us examine the professional techniques required for the most common footwear materials, enabling you to proceed with precision and confidence.
This is where your toolkit is deployed. Understanding the distinct properties of each material is what separates amateur work from professional results.
Mastering Smooth Leather
Smooth leather is durable and aesthetically pleasing, but its porous nature makes it susceptible to staining if contaminants are not addressed promptly. The most significant error is using harsh, alkaline-based cleaners that strip the leather’s natural oils, leading to desiccation, cracking, and a dull finish.
Consider salt stains from winter conditions. The resulting white lines are not surface residue; they are alkaline mineral deposits left after water evaporation. Neutralizing them requires a gentle, acidic solution.
- Prepare the Solution: Combine cool water and white vinegar in a two-to-one ratio. This mild acid is effective at dissolving alkaline salt deposits without damaging the leather.
- Application: Lightly dampen a microfiber cloth with the solution. Do not saturate. Gently wipe the stained areas using small, circular motions to lift the salt from the pores.
- Rinse and Dry: Use a second cloth dampened with plain water to remove any vinegar residue. Pat the area dry with a third, dry towel. Allow the shoes to air dry away from direct heat or sunlight.
Post-treatment, reconditioning is mandatory. A quality leather conditioner replenishes the oils and lipids removed during cleaning, maintaining the material’s suppleness and preventing future damage.
The Delicate Art of Suede and Nubuck Care
Suede and nubuck present a unique challenge. Their napped surfaces are highly absorbent and prone to matting, making them magnets for dirt, water, and oil. The cardinal rule for these materials is: minimize liquid exposure. Water is often the primary antagonist, causing discoloration and stiffening the nap upon drying.
Oil stains represent the most difficult scenario. Upon contact, oil penetrates deep into the fibers. The only effective countermeasure is immediate absorption.
Suede's delicate texture demands a dry-first approach. Rushing to use a liquid cleaner on an oil stain will only spread it further and drive it deeper into the material, making it nearly impossible to remove.
Upon noticing an oil stain, apply cornstarch or talcum powder immediately. These fine powders possess a high absorbent capacity. Apply a thick layer over the fresh stain and allow it to sit for several hours, or overnight for severe stains. The powder will draw the oil out of the suede fibers via capillary action. Afterward, use a suede brush to remove the powder.
For residual marks or general grime, the Suede & Nubuck Eraser is the primary tool. It creates gentle friction that crumbles and lifts dirt particles from the nap. For more in-depth techniques, consult this professional guide on how to remove a stain from suede.
Cleaning Porous Canvas and Mesh
Canvas and mesh are resilient materials, but their woven construction allows stains to penetrate deeply. While they tolerate more moisture than leather or suede, machine washing is ill-advised. The high heat and agitation can degrade the adhesives used in shoe construction, leading to delamination.
A manual, targeted approach is superior. For a typical mud splatter on canvas footwear:
- Dry Brush First: Allow the mud to dry completely. Use a stiff-bristle brush to remove all loose, caked-on dirt. This prevents turning dry soil into a slurry.
- Mix a Cleaning Solution: In a bowl of cool water, add a small amount of a pH-balanced shoe cleaner, such as the Gold Standard Premium Shoe Cleaner. Avoid laundry detergents or dish soaps, which can leave behind residues that cause yellowing.
- Scrub Gently: Dip a medium-bristle brush into the solution and work the stained area in small, circular motions. The solution will foam as it lifts particulate from the fabric weave.
- Blot, Do Not Rub: Use a clean microfiber towel to blot the area, absorbing the soiled foam. Repeat the scrubbing and blotting process until the stain is gone.
- Air Dry Correctly: Stuff the shoes with paper towels or insert shoe trees to maintain their shape. Allow them to air dry completely, away from direct sunlight.
This methodology is also effective for synthetic mesh, though a softer brush is recommended to avoid snagging the fibers. Our complete guide on how to clean sneakers at home provides further detail.
Material vs. Method: The Right Tool for the Job
Selecting the correct tool is as critical as the cleaning technique itself. Using an inappropriate brush or chemical can cause irreversible damage. This table provides a quick-reference guide to ensure proper tool selection.
| Material | Recommended Tools | Methods to Avoid |
|---|---|---|
| Smooth Leather | Microfiber cloths, soft horsehair brush, pH-balanced cleaner, leather conditioner | Harsh alkaline soaps, excessive water, abrasive pads, heat drying |
| Suede & Nubuck | Suede eraser, suede brush, cornstarch/talcum powder (for oil) | Water, liquid cleaners, wire brushes, soaps of any kind |
| Canvas & Mesh | Medium/soft bristle brushes, microfiber cloths, pH-balanced cleaner | Machine washing, bleach, hard-bristle brushes (on mesh), dish soap |
| Rubber & Synthetics | Microfiber cloths, stiff-bristle brush (for soles), sneaker cleaner | Abrasive melamine foam erasers, acetone, harsh solvents, bleach |
Consult this table before beginning any cleaning task to prevent costly errors and preserve the integrity of your footwear.
Navigating Modern Synthetics and Rubber
Modern footwear frequently incorporates synthetic leathers, knit textiles, and rubber components. While generally more resilient than natural materials, they are not impervious to stains and scuffs.
White rubber midsoles are particularly prone to discoloration. Many turn to melamine foam erasers, but these are micro-abrasives that can degrade the rubber's finish over time, causing a dull appearance.
A safer and more effective method is to use a standard shoe cleaning solution with a microfiber towel. The towel’s texture provides sufficient abrasion to lift most scuffs without damaging the surface. For stubborn marks, a stiff-bristle brush can be used carefully on the midsole, avoiding contact with the upper. Patience and a quality cleaner will yield superior results without resorting to destructive abrasives.
How to Tackle Common Types of Stains
Understanding material science is the first half of the equation. The second is understanding the chemical nature of the stain itself. Different substances require different countermeasures; a method effective for mud may permanently set a grease stain.
This is not generic advice. This is a tactical breakdown for neutralizing the most common and challenging stains you will encounter. Swift, intelligent action is paramount.
Defeating Oil and Grease Stains
An oil or grease stain on a porous material like suede or canvas can seem catastrophic. The key principle for mitigation is absorption, and the critical variable is speed. Lipids begin wicking into fibers immediately upon contact.
Under no circumstances should water be applied to a fresh oil stain. This is a fundamental error that will only spread the lipid over a larger surface area, compounding the problem.
Instead, immediately apply an absorbent powder.
- Cornstarch or talcum powder are ideal. Their fine particulate structure provides a large surface area for absorbing lipids.
- Application is key. First, blot excess oil with a clean cloth, do not rub. Then, apply a thick, generous layer of powder over the entire stain.
- Patience is required. Allow the powder to sit for several hours, or overnight for significant stains. This allows time for the capillary action to draw the oil out of the material's fibers.
After the waiting period, gently brush the powder away. The process may need to be repeated for deep-set stains. Only after maximal absorption has been achieved should a spot treatment with a cleaner be considered.
Eradicating Ink Marks
Ink is a dye, and improper removal techniques will cause it to bleed, creating a larger, more permanent stain. The cardinal rule is to never apply a solvent directly to the shoe.
Pouring isopropyl alcohol onto an ink mark will cause the dye to spread into the surrounding material, creating a halo effect that is often more conspicuous than the original stain.
The correct technique for ink removal involves a controlled application. By applying the solvent to an applicator first, you maintain control, lifting the ink out of the material rather than pushing it deeper.
The professional protocol is as follows:
- Moisten a clean, white microfiber cloth or cotton swab with a small amount of isopropyl alcohol.
- Gently dab the ink stain using a direct blotting motion. Do not rub or use circular motions.
- Observe the applicator after each dab; you should see ink transfer from the shoe to the cloth.
- Continuously switch to a clean section of the cloth or a new swab to prevent redepositing the ink.
This is a methodical, patient process, but it is the only way to remove ink cleanly. Always perform a spot test on an inconspicuous area of the shoe first to ensure the solvent does not affect the material’s color.
Neutralizing Stubborn Grass Stains
Grass stains are pigment-based, caused by chlorophyll bonding with the shoe's fibers. This is particularly problematic on canvas, mesh, and even the stitching of leather footwear. Removal often requires a mild chemical reaction.
For canvas or synthetic materials, a solution of one part white vinegar to two parts water can be effective. Apply with a cloth, let it sit for several minutes to break down the chlorophyll, then gently scrub with a soft brush before using a dedicated shoe cleaner.
Exercise extreme caution with this method on delicate materials. For suede, a dedicated eraser should always be the first line of attack to physically lift the stain particles away from the nap.
Managing Mud and Dirt
Mud is a common yet easily managed stain if one principle is followed: allow it to dry completely. Attempting to wipe wet mud will smear fine silt particles deeper into the material's weave or pores, complicating removal.
Once the mud is fully desiccated, use a stiff-bristle brush to break off and remove the dried chunks. A surprising amount of the stain can be removed mechanically before any cleaning solution is needed. What remains can then be treated with your material-specific cleaner.
This "dry-first" strategy is a universal principle for mud. As detailed in these effective mud stain removal tips, patience prevents smears and makes the final cleaning far more efficient.
Post-Cleaning Care and Proactive Prevention
Stain removal is only the first phase of restoration. The post-cleaning protocol is equally critical to the long-term integrity of your footwear.
A common mistake is rushing the drying process. This impatience can lead to warped uppers, stiffened materials, or water damage that is more severe than the original stain.
Proper drying is the most critical step. After any cleaning that involves moisture, shoes must be allowed to air-dry naturally and completely. This means avoiding all direct heat sources—radiators, heating vents, and direct sunlight. Forced heating can shrink materials, distort the shoe's shape, and compromise the integrity of sole adhesives.
Restoring and Reconditioning Materials
Even gentle cleaning agents can strip some natural oils and factory-applied finishes from materials, particularly leather. Leather requires these oils and lipids to maintain its flexibility and tensile strength. Bypassing the reconditioning step after a deep clean invites desiccation and cracking.
For smooth leather footwear, applying a quality leather conditioner is non-negotiable. Work a small amount into the material with a clean microfiber cloth in small, circular motions. This simple action replenishes lost moisture, restores the leather’s natural finish, and adds a layer of protection.
Think of post-cleaning care as the final, essential step in the stain removal process. It’s what transitions your footwear from simply being clean to being fully restored and protected for the future.
Building a Defensive Barrier
The most effective way to manage stains is to prevent them from setting. Once your shoes are clean, conditioned, and fully cured, the final step is to apply a protective barrier. A high-quality repellent spray creates an invisible, hydrophobic shield over the material.
Modern protective sprays form a microscopic layer that increases the surface tension of the material, causing liquids to bead up and roll off. This provides a critical window of time to wipe away a spill before it can penetrate the fibers. It is a proactive strategy that significantly reduces the frequency and severity of staining.
- Application is key: Hold the can approximately 6-8 inches from the surface and apply a light, even coat.
- Avoid oversaturation: Two light, uniform coats are superior to one heavy, saturated coat.
- Allow for curing: The protective barrier requires time to bond with the material. Allow at least 24 hours for the shoes to cure in a well-ventilated area before wear.
Investing in a high-performance protectant is the single most effective measure you can take to preserve the condition of your footwear. For a reliable, breathable barrier effective on suede, leather, canvas, and nubuck, our Gold Standard Premium Sneaker Protector Spray is engineered to provide elite-level defense without altering the material's appearance or texture.
A complete care cycle—clean, condition, protect—is the hallmark of a professional approach, dramatically extending the functional life and aesthetic quality of your entire collection.
Your Top Shoe Stain Questions, Answered
Even with detailed protocols, specific questions arise. After years of material analysis and professional care, we have addressed nearly every conceivable scenario.
Here are direct, field-tested answers to the most frequent inquiries we receive.
Can I Just Use Dish Soap or Other Household Cleaners on My Shoes?
We strongly advise against it. Household cleaners are formulated for hard, non-porous surfaces like ceramic and laminate. They are chemically incompatible with the materials used in footwear.
The harsh surfactants and unbalanced pH levels in these products will strip leather of its essential oils, leaving it dry, brittle, and prone to cracking. On delicate materials like suede, they will cause permanent discoloration and matting of the nap.
Always use a pH-balanced cleaner specifically formulated for footwear materials. It is the only way to ensure you are removing contaminants without causing insidious, long-term structural damage.
A common mistake is thinking "clean is clean." But using the wrong chemical on a shoe is like taking a metal scourer to a non-stick pan—sure, you might get the gunk off, but you've just ruined the surface.
What’s the Real Secret to Getting Out Old, Set-In Stains?
For set-in stains, the strategy shifts from rapid response to patient, methodical treatment. This is a process of restoration, not a quick fix. The key is patience and repeated, gentle applications.
On durable materials like leather or canvas, this may involve several cycles of applying a specialized shoe cleaner, allowing it to penetrate for several minutes, followed by gentle agitation with a brush and blotting.
For suede, an eraser and brush are the primary tools. The objective is to slowly and carefully abrade the stained fibers away from the nap. Aggressive scrubbing will only drive the stain deeper and damage the material. If a stubborn, set-in stain (particularly one that is oil-based) does not respond to multiple careful treatments, consultation with a professional cobbler is the next logical step.
Is It Ever Okay to Throw My Sneakers in the Washing Machine?
As a general rule, no—especially for any footwear of significant value. A washing machine is a high-stress environment for a shoe.
Prolonged water submersion, high-speed tumbling, and aggressive detergents systematically degrade the adhesives bonding the shoe's components. The most common result is sole separation.
The process can also permanently warp the shoe's shape and damage delicate materials beyond repair. While some inexpensive canvas shoes might survive a cold, gentle cycle inside a mesh bag, manual, targeted cleaning is always the safest and most effective method. It is the only way to preserve your footwear’s structural integrity, material quality, and overall condition.
Your footwear is an investment. Treat it accordingly, using products engineered to clean, protect, and preserve. Gold Standard provides the professional-grade tools to maintain that original, out-of-the-box condition for years to come.
Explore the Gold Standard collection and elevate your shoe care routine today.
Article created using Outrank