
Before approaching a stain, you must first identify it. The method of attack is entirely dependent on the nature of the stain.
For dry debris, such as scuffs or surface dirt, a suede eraser and brush are the correct initial tools. For wet stains—a liquid spill or oil spot—immediate action is critical. Blot the spill without delay, then apply an absorbent powder like cornstarch to draw the liquid out of the fibers before it can set permanently.
With suede, the correct tools and immediate, proper technique are non-negotiable. An incorrect response can result in irreversible damage.
Understanding Suede Material Science
The soft, matte texture of suede is known as its "nap." This nap is precisely what makes the material so susceptible to staining. Unlike standard leather, which is the tough, outer grain of an animal hide, suede is derived from the softer, more porous inner layer. This structure causes it to absorb liquids and oils readily, making stain removal a technical challenge.
Before attempting any cleaning, internalize these two foundational principles:
- Water is a tool, not a universal solution. Misuse of water can spread a stain, leave a permanent water spot, or cause the nap to become stiff and brittle upon drying. Harsh chemical cleaners or common household soaps will strip the natural oils and dyes from the material, causing irreparable discoloration and damage.
- Work with the material, not against it. The objective is to lift the stain out of the nap, not grind it deeper. Aggressive scrubbing will crush the delicate fibers or wear them away entirely, creating a bald spot from which there is no recovery.
The Foundational Principles of Suede Stain Removal
Successful stain removal is a direct function of a rapid and correct response. The moments immediately following a spill often determine the difference between a five-minute correction and a permanent blemish. This is not merely cleaning; it is material preservation.
The global market for effective stain removal solutions reflects this understanding. The demand for specialized, high-quality cleaning products is a direct response to consumers' desire to protect premium materials like suede.
The most common error we observe is panic-cleaning with improper tools. Reaching for a wet cloth and dish soap is a reflex that can permanently damage suede. The correct approach is always methodical, starting with the least aggressive technique first.
A disciplined methodology is the best defense against escalating a minor incident into a significant problem. Adhering to these principles ensures that you treat your footwear with the technical expertise it requires, setting the stage for successful stain removal.
Your Essential Suede Care Toolkit
Possessing the correct equipment is half the battle. While professional-grade tools are engineered for specific tasks, certain household items can suffice in an emergency if used with caution. This is the essential arsenal for suede care.
| Tool | Primary Use | Gold Standard Recommendation | Safe Household Alternative |
|---|---|---|---|
| Suede Brush | Restoring the nap, brushing away loose dirt and dry stains. | Gold Standard Premium Double-Sided Shoe Cleaning Brush | A clean, dry toothbrush or a nail brush. |
| Suede Eraser | Gently lifting out embedded dirt, scuffs, and minor stains. | Included in our Gold Standard Premium Shoe Cleaner Kit. | A simple pencil eraser (white or art gum only!). |
| Absorbent Powder | Soaking up fresh liquid spills like oil, grease, or water. | N/A | Cornstarch, talcum powder, or baking soda. |
| Microfiber Towel | Blotting wet stains, applying cleaners, and wiping down. | Gold Standard Premium Microfiber Towel | A clean, dry, lint-free cloth. |
| Suede Cleaner | A specialized solution for tackling tougher, set-in stains. | Gold Standard 8oz Premium Shoe Cleaning Solution | White vinegar or rubbing alcohol (use sparingly). |
This toolkit prepares you for nearly any suede care scenario. We will now detail the precise application of these tools for different stain types.
How to Tackle Different Types of Suede Stains
Not all stains are created equal. Treating a grease spot with the same method used for a water mark is one of the fastest ways to permanently set the stain. This is a classic, avoidable error. The first step in any effective treatment is to correctly identify the stain, as this dictates the entire strategy and prevents further damage.
Consider this a field guide to the most common suede emergencies. Success lies in matching the strategy to the stain. Is it wet or dry? Oil-based or water-based? Answering that question correctly is half the battle.
This flowchart outlines the critical first decision you must make when a stain occurs. The entire process hinges on one variable: is the stain wet or dry?
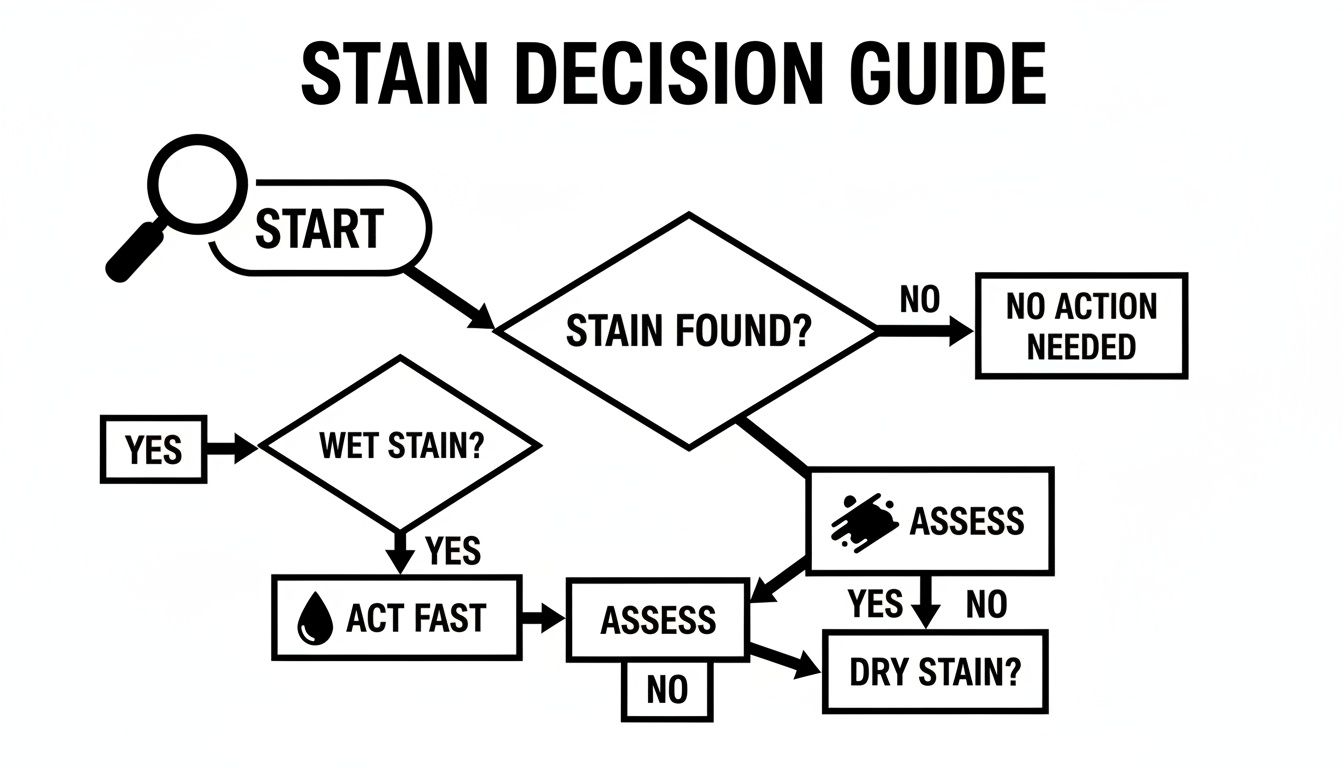
This logic is fundamental to proper suede care. Wet stains require immediate blotting to absorb excess liquid, while dry stains allow for a more measured, methodical approach.
Removing Water Spots
It sounds counterintuitive, but the most effective way to remove a water spot is often with a controlled application of more water. The goal is not to soak the shoe, but to evenly dampen the entire affected panel to eliminate the "tideline" left by the original spot.
Take a clean cloth or a soft-bristled brush and dampen it lightly. Gently work over the entire surface, feathering the moisture outward from the stained area until the section has a consistent, light dampness. Do not saturate the material.
Once complete, stuff the shoes with paper towels or, preferably, cedar shoe trees. This helps draw moisture from the interior and ensures the footwear maintains its shape as it dries. Allow them to air dry naturally, away from direct heat sources like radiators or sunlight, which will cause the suede to become stiff and brittle.
Handling Oil and Grease Stains
If you spill oil or grease on suede, you must act immediately. This is a non-negotiable, drop-everything moment. Your first line of defense is an absorbent powder, such as cornstarch or talcum powder.
Apply a generous amount directly onto the fresh stain. Do not be sparing. Allow it to sit for several hours, or overnight if possible. The powder's function is to draw the oil out of the suede's porous fibers. Once sufficient time has passed, use a suede brush to gently whisk the powder away. For stubborn or set-in stains, a second application may be necessary.
For a persistent grease spot, a small amount of white vinegar applied with a clean microfiber cloth can be effective. It helps break down the oil. Dab the area gently—never rub—and allow it to dry completely before brushing to restore the nap.
Erasing Scuffs and Dirt
Dry contaminants like scuffs and surface dirt are typically the easiest to address, provided you have the correct tool. This is where a suede eraser demonstrates its value.
It functions similarly to a pencil eraser. Apply gentle but firm pressure directly to the scuff or dirt mark. You will see the eraser begin to crumble as it lifts the grime out of the suede’s nap.
After erasing the mark, follow up with a suede brush. A few quick passes will remove the eraser debris and lift the nap, restoring the uniform, velvety texture.
Attacking Ink and Salt Stains
Ink is one of the most challenging stains. If caught while fresh, immediately blot the stain with a cloth dampened with rubbing alcohol. Always work from the outside of the stain inward to prevent it from spreading. It is imperative to test the alcohol on an inconspicuous area first, as it can sometimes lift the dye from the suede.
Winter weather introduces its own challenges, namely the white tidelines left by road salt. To address these, create a solution of one part white vinegar to two parts water. Dip a cloth in the mixture, wring it out thoroughly, and lightly dab the salt lines until they disappear. Allow the shoes to air dry completely, then finish with a thorough brushing.
Ultimately, having the right technique is everything. Improper cleaning is a huge issue, causing an estimated 40% of premature wear on high-quality footwear. When you use products designed for the job, the results speak for themselves. In controlled tests on common culprits like oil and water spots, all-natural solutions have been shown to outperform synthetic competitors by 35% in pure stain-removing power. This data just goes to show how crucial it is to pick a cleaner that’s both effective and safe for the material. You can learn more about the effectiveness of premium shoe cleaners and their impact from detailed industry reports.
Restoring Suede Texture After Cleaning
Removing the stain is a critical victory, but the process is not complete. After cleaning, suede can sometimes appear flat, feel stiff, or show slight discoloration. This is a normal consequence of the cleaning process.
The final step—restoring the signature velvety texture, or "nap"—is what distinguishes a simple fix from a professional-level restoration. Mastering these finishing techniques is how you return footwear to its original, out-of-the-box condition.
First, the suede must be 100% dry. Attempting to work on a damp nap will permanently mat the fibers. Patience is essential. Allow footwear to air dry naturally for at least 24 hours, keeping it away from direct heat sources like radiators or hair dryers, which can cause the material to shrink or warp.
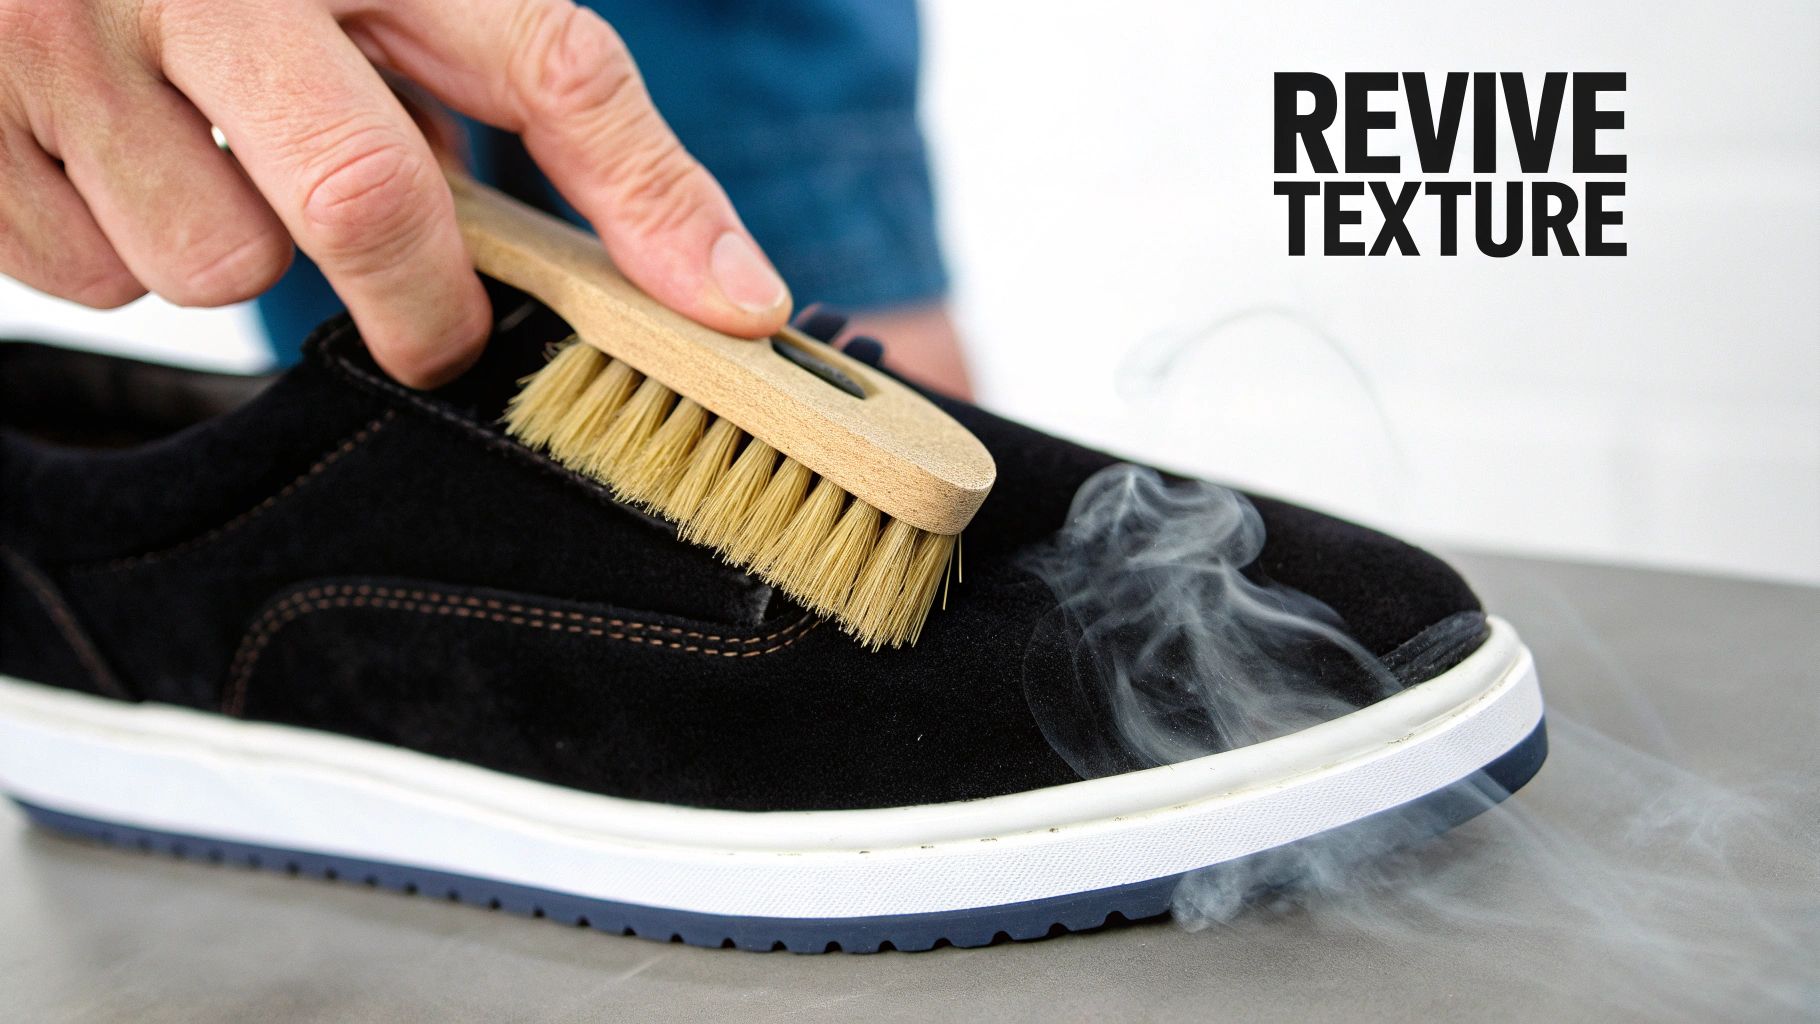
Brushing to Revive the Nap
Once your shoes are completely dry, it is time to restore the suede fibers. A proper suede brush is indispensable for this task. A high-quality tool, like the Gold Standard Premium Double-Sided Shoe Cleaning Brush, is designed with two distinct sides for specific functions:
- Soft Bristles: Ideal for a general, all-over buff. Use this side first to lift the majority of the nap and create a uniform appearance.
- Brass/Nylon Bristles: This is for targeted treatment. Reserve the firmer side for stubborn, matted-down areas that resist initial brushing.
Begin with the soft bristles, brushing the entire shoe in gentle, consistent strokes. This will begin to revive the texture across the whole surface. If any areas remain flat or stiff, switch to the brass bristles. Use short, light flicks to agitate and raise the stubborn fibers. Be firm, but not forceful—let the tool perform the work.
A common mistake is brushing in a circular motion. This can create swirl marks or even bald patches. Always use consistent, back-and-forth strokes to lift the nap evenly and avoid damaging the delicate texture.
Using Steam for a Professional Finish
If extensive brushing fails to resolve stiffness, a light application of steam can be transformative. Steam gently relaxes the leather fibers, making them significantly more pliable and responsive to brushing.
No specialized equipment is necessary. Hold a steaming kettle or an iron (on a steam setting) approximately six to eight inches away from the suede. The key is constant motion to avoid saturating any single area.
Immediately after a light steaming, use your suede brush while the fibers are still warm and malleable. This combination of steam and brushing is the professional secret to restoring that plush, factory-fresh feel. It is the final touch that validates the cleaning effort, leaving you with impeccably maintained suede.
The Cardinal Sins of Suede Care: Mistakes That Will Ruin Your Shoes
Understanding what not to do is as critical as knowing the correct cleaning procedures. Countless well-intentioned footwear owners, armed with poor advice, have inadvertently caused permanent damage. This is not about fear; it is about respecting the unique properties of suede and avoiding costly, irreversible errors.
Think of the suede's nap as a delicate material structure. The wrong action can disrupt it entirely, turning a small, correctable issue into a complete loss.
Mistake #1: Using Harsh Cleaners
The most common—and catastrophic—error is using a standard household cleaner. Products like dish soap, all-purpose sprays, or laundry detergent are strictly forbidden. These formulas are engineered to strip grease and soil aggressively, which is suitable for hard surfaces but devastating to suede. They will extract the natural oils and dyes from the hide, resulting in a faded, brittle, and permanently discolored patch.
This is a non-negotiable rule: never use cleaning agents not specifically formulated for suede or other delicate leathers. The damage is almost always immediate and irreversible.
Mistake #2: Applying Direct Heat
Patience is a fundamental virtue in suede care, especially during the drying phase. The temptation to accelerate the process with a hairdryer or by placing shoes near a heat source is a direct path to ruin. Direct, high heat essentially "cooks" the leather, causing it to shrink, warp, and become irreparably stiff and brittle.
This heat damages the protein structures within the suede, leading to a cracked texture that no amount of conditioning or brushing can fix. Always allow suede to air dry naturally, away from any direct heat source, even if it requires a full 24 hours.
Mistake #3: The Aggressive Scrubbing Fallacy
When faced with a stubborn stain, the instinct is often to apply more force. With suede, this is one of the worst possible reactions. Frantic scrubbing does not lift the stain; it physically destroys the material. The friction tears away the fine fibers that constitute the velvety nap, resulting in a smooth, bald, or shiny spot that is impossible to hide.
A "bald spot" on suede is not a stain to be cleaned—it is physical damage. The nap has been permanently abraded. Once those fibers are gone, they cannot be restored. This is precisely why a gentle touch with the correct tools is so critical.
Mistake #4: The Washing Machine Myth
Let us put this misconception to rest permanently. Under no circumstances should suede footwear be placed in a washing machine. The combination of total water saturation, the violent tumbling action, and harsh detergents is a guaranteed formula for destruction. The items will emerge misshapen, discolored, and with a texture that is beyond recovery. Suede care demands precision and a controlled approach—qualities a washing machine cannot provide.
Protecting Your Suede Footwear Proactively
The most effective method for dealing with a stain is to prevent it from occurring in the first place. While knowing how to clean suede is an essential skill, shifting from a reactive to a proactive mindset is what distinguishes a pristine collection from a damaged one. This is how you protect your investment before it is ever at risk.
The cornerstone of any proactive protection strategy is a high-quality suede protectant spray. Consider it an invisible barrier for your footwear. A well-formulated spray creates a hydrophobic surface that causes water and oil to bead up and roll off rather than being absorbed.
Crucially, a premium spray achieves this without sealing the material's pores. This allows the suede to breathe, preserving its signature soft, pliable texture.
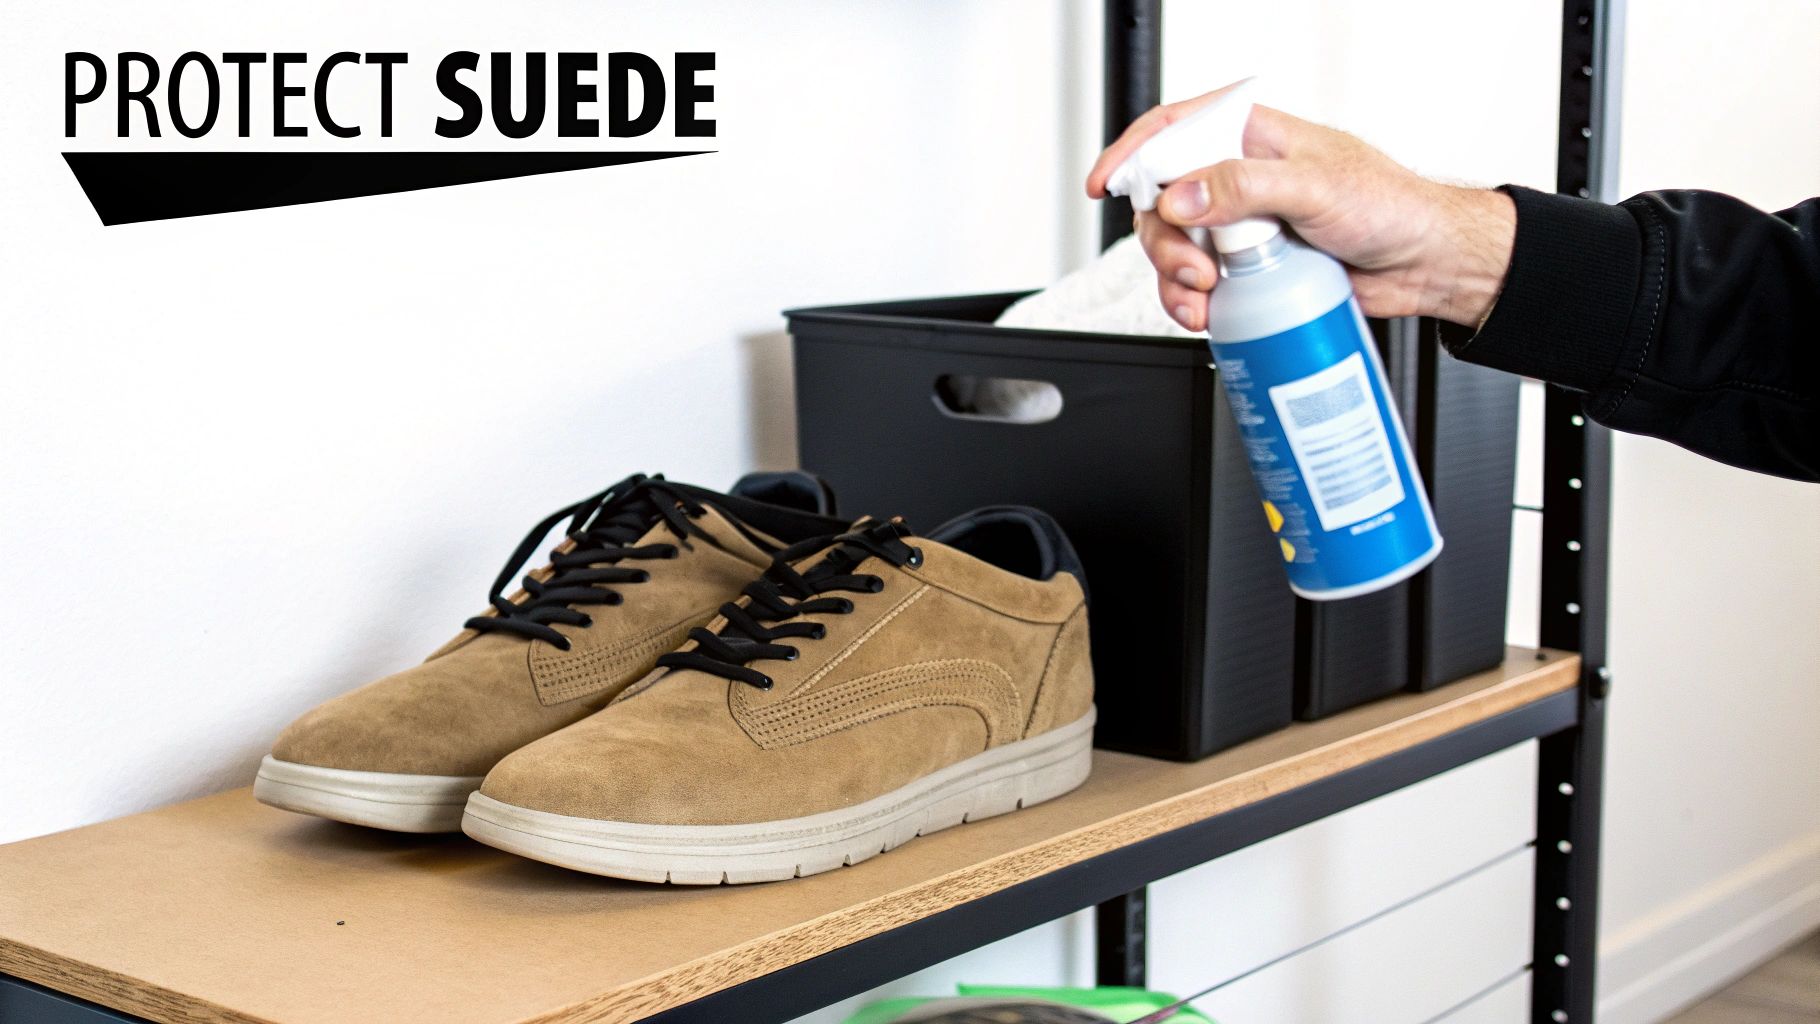
Applying Protectant Correctly
The application technique is critical. A rushed job will result in patchy coverage and vulnerabilities.
For a correct application every time:
- Start with a clean surface. Always apply protectant to clean, dry suede. Spraying over existing dirt will seal it in.
- Maintain proper distance. Hold the can 6-8 inches from the shoe to ensure a fine, even mist rather than a concentrated, saturated application.
- Sweep, don't soak. Use smooth, sweeping motions to apply a light, even coat. Avoid concentrating the spray in one area.
- Allow it to cure. This is the most frequently skipped step. Let the footwear dry completely in a well-ventilated area for at least 24 hours. This period is essential for the protective barrier to fully bond with the fibers.
Reapply the protectant every few months, or more frequently if the footwear is worn often or exposed to harsh weather conditions.
The objective is protection, not saturation. A single, light coat is significantly more effective than a heavy, drenched one. Over-application can stiffen the nap and may even permanently darken the suede's color.
Proper Storage is Your Second Line of Defense
How you store your suede when not in use is as important as a protectant spray. Never leave footwear in direct sunlight, which will bleach the color over time. Storing them in a damp, unventilated space invites mildew.
For serious footwear collectors, this level of care is standard practice. With 55% of sneaker enthusiasts owning suede pairs and 65% citing stains as their primary concern, investing in proper care tools is a logical step.
This is why the market for suede cleaning equipment is projected to reach USD 0.99 billion by 2033. Consumers are serious about preserving their investments. You can find more details on this trend in various business research reports tracking consumer demand. A pair of cedar shoe trees is a simple yet transformative tool; they absorb moisture and odors while helping the shoes maintain their shape, preventing creasing and extending their lifespan for years.
Your Suede Care Questions Answered
Even with a solid care strategy, specific questions inevitably arise. These common scenarios can be the difference between a successful restoration and a trip to a professional cobbler.
Let's address some of the most frequent suede care challenges.
Can I Use Water to Clean All Suede Stains?
No. This is perhaps the most destructive myth in suede care.
While a lightly damp cloth may lift some fresh surface dirt, applying water to an oil or ink stain is a critical error. Water will drive the stain deeper into the suede's porous fibers and will likely leave a distinct water ring or "tideline," which is often more difficult to remove than the original stain.
Always begin with a dry cleaning method. Identify the stain, select the appropriate tool, and proceed methodically. Water should be a last resort, used sparingly and with precision—never by soaking the material.
My Suede Shoes Got Soaked. Are They Ruined?
Not if you act quickly. The moment they are removed, stuff them with absorbent paper towels or, ideally, cedar shoe trees. This accomplishes two critical tasks simultaneously: it wicks moisture from the interior and helps the shoes maintain their structural shape as they dry.
The worst possible action is to place them near a heater, vent, or any direct heat source. This will shrink the suede, making it stiff, brittle, and prone to cracking. Patience is essential. Allow them to air dry naturally for a minimum of 24 hours.
Once completely dry, the suede will likely feel stiff and appear matted. This is normal. Use a quality suede brush to gently work the surface in multiple directions. This will lift the fibers and restore the material's soft, velvety texture.
What Is the Difference Between a Suede Eraser and a Pencil Eraser?
While they may appear similar, they are fundamentally different tools designed for different purposes.
A proper suede eraser is made from a friable composite material. It is designed to gently abrade the surface, creating a fine grit that penetrates the nap to lift embedded dirt and scuffs. It is engineered to crumble as it works, carrying the contaminants away with it.
A standard pencil eraser is a denser, smoother polymer designed to lift graphite from a flat paper surface. When used on suede, it does not lift debris; it flattens and burnishes the nap, creating a shiny, bald-looking patch. This constitutes permanent damage. Using the correct tool is not a recommendation; it is essential for the preservation of the material.
Your footwear is an investment that deserves more than a quick fix—it requires a solution developed by material experts.
The Gold Standard Premium Shoe Cleaner Kit is your complete care arsenal. It includes the essential tools, such as our purpose-built suede eraser and double-sided brush, enabling you to address any stain with technical confidence.