
Properly cleaning leather shoes is a methodical process, not a quick fix. The foundational technique is straightforward: remove loose debris with a dry brush, apply a suitable cleaner in a circular motion, wipe the surface clean, and allow the shoes to air dry completely. This disciplined routine is essential for maintaining the leather's structural integrity, preventing the premature cracking and fading that degrades high-quality footwear.
Shoe Care Is Preservation, Not Just Cleaning
Before reaching for any product, it's critical to adopt the right mindset. Leather care is not an occasional task but a consistent maintenance discipline. High-quality leather is a natural material—it is porous, it breathes, and it contains oils that maintain its flexibility and strength. Hasty cleaning or, more damagingly, the use of inappropriate products, can cause irreversible harm.
A common and critical error is using household cleaners for spot treatments. Dish soap, multi-purpose sprays, and vinegar-based solutions are fundamentally incompatible with leather. Their chemical compositions are too aggressive, stripping the material of its essential moisture and leaving the protein fibers brittle and susceptible to fracture. What begins as a minor cleaning task can quickly escalate into a significant restoration issue.
Protecting Your Investment Through Proactive Care
Effective leather care is proactive, not reactive. Whether for formal dress shoes or premium sneakers, a preventative approach is paramount. Dirt and moisture are the primary agents of degradation. Regular cleaning prevents abrasive particles from penetrating the leather's pores, where they can physically sever the fibers from within.
This is why a dedicated care regimen is non-negotiable for extending the life and appearance of your footwear collection. The global shoe care market is projected to reach USD 7.23 billion by 2032, a clear indicator that consumers increasingly recognize the value of proper maintenance. Data shows that harsh household cleaners can damage up to 40% of sneakers within months. Conversely, well-maintained leather footwear often commands a resale value that is 20-35% higher. This data, detailed in comprehensive shoe care market research, underscores the tangible return on investing in correct knowledge and materials.
At its core, the principle is simple: Leather is an organic material that reacts to its environment. Your job isn't just to wipe off dirt, but to preserve the material's integrity for the long haul.
The Gold Standard Approach
Our entire philosophy at Gold Standard is rooted in this principle of preservation. We prioritize education, equipping owners with the material-specific knowledge required for proper footwear care. This is not about brand loyalty; it's about understanding the science of the materials.
- Gentle Yet Effective Formulas: A superior cleaner must lift dirt and stains without stripping the leather's natural conditioning oils.
- Purpose-Built Tools: A soft hog-hair brush is engineered to dislodge debris from seams and pores without scratching the finish. A microfiber towel is designed to absorb residue without leaving lint. Every tool serves a specific function.
- Focus on Long-Term Material Health: The objective is always to clean, condition, and protect. The goal is footwear that not only appears new but remains structurally sound for years of use.
Assembling a Professional-Grade Cleaning Kit
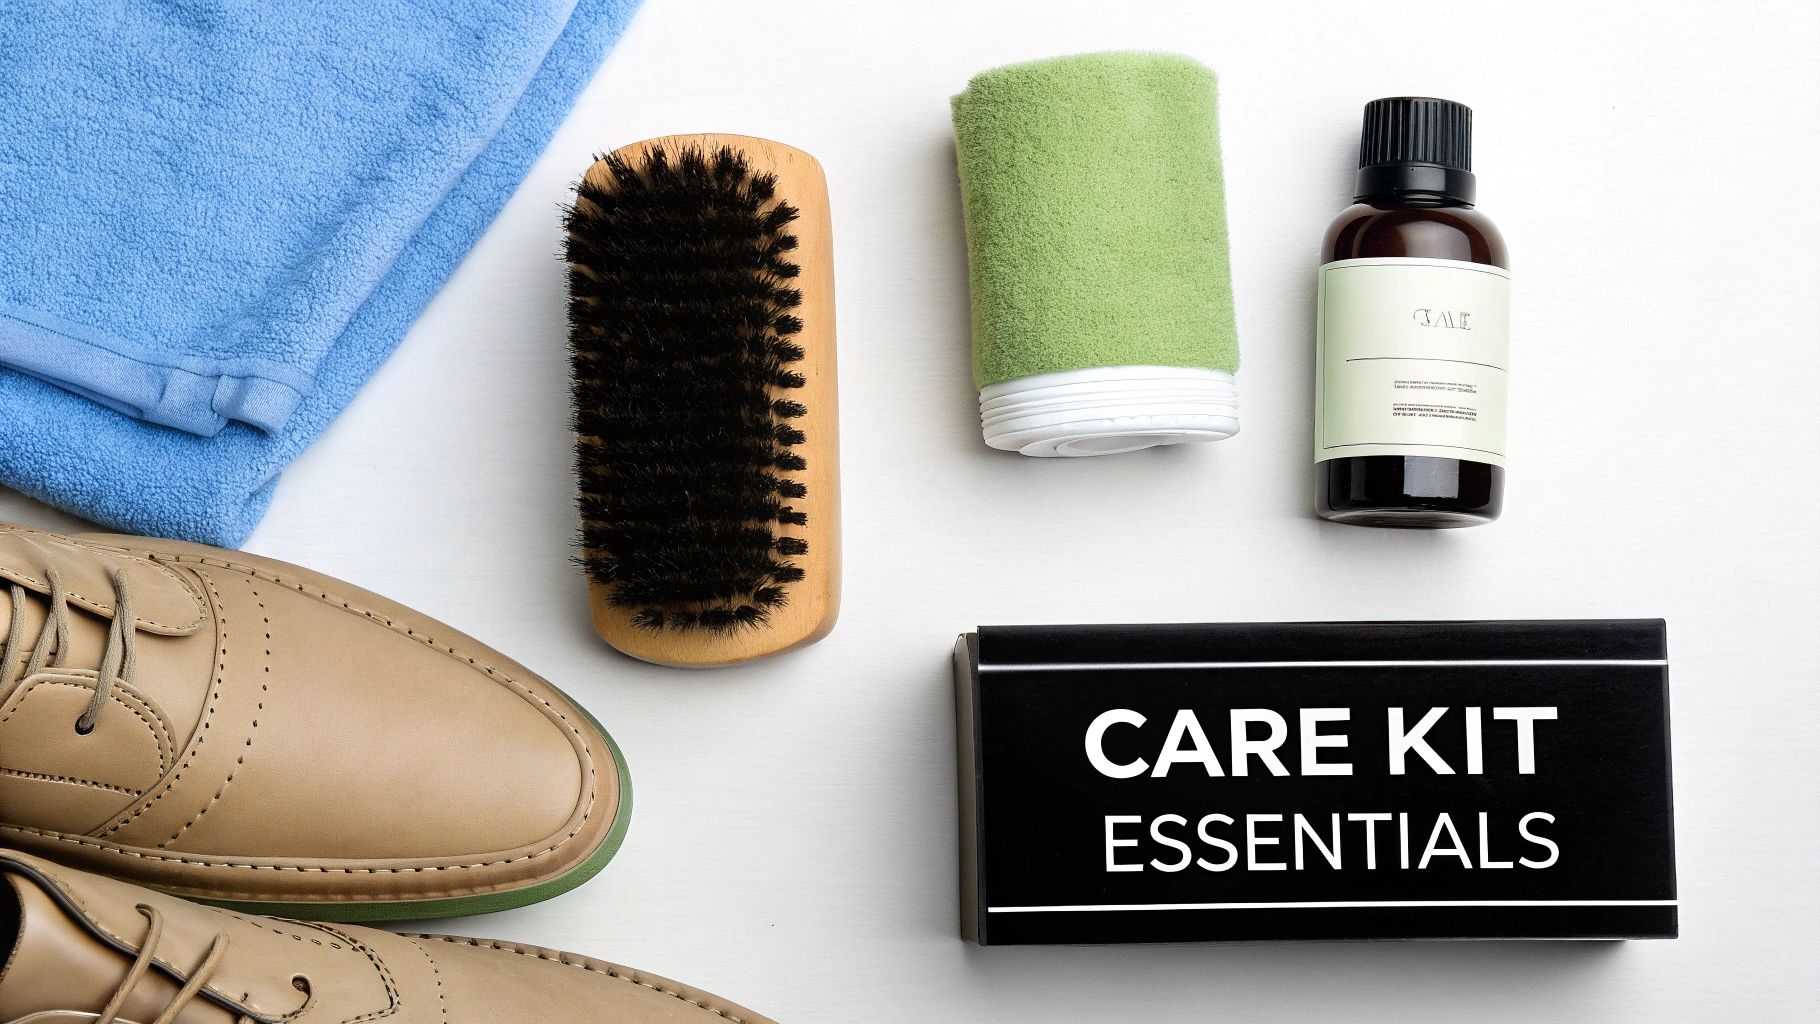
Achieving a professional-level clean at home is a matter of technique and proper tooling, not brute force. Aggressive scrubbing and harsh chemicals are counterproductive. A dedicated kit ensures you have the correct equipment to clean leather shoes effectively and safely.
Approach the task as a careful restoration, not a chore. With the right equipment, you can address everything from surface dust to embedded grime while respecting the inherent qualities of the leather.
Essential Tools of the Trade
Every specialist relies on a curated toolkit. For shoe care, a few key items are non-negotiable, each chosen for its specific purpose.
-
Soft Hog Hair Brush: This is your primary tool for surface preparation. Hog hair offers the ideal balance of stiffness and softness—firm enough to clear debris from welt stitching and brogue perforations, yet gentle enough to avoid marring the finish. Inexpensive synthetic brushes are often too rigid and can cause micro-scratches.
-
Premium Microfiber Towels: Retire old cotton rags and paper towels. A high-quality microfiber towel is superior due to its high absorbency and lint-free properties. It effectively removes cleaning solution and residue without leaving behind fibers that can get trapped in seams or polish.
-
Cedar Shoe Trees: These are arguably the single most important tool for the long-term structural health of your shoes. Insert them before cleaning to create a firm, smooth surface to work against. Critically, unvarnished cedar absorbs residual moisture and odor from the interior lining while ensuring the shoe maintains its intended shape as it dries, preventing creasing and curling.
Selecting the Right Cleaning Solution
While tools perform the mechanical work, the cleaning solution handles the chemical lifting. This is not an area for compromise. The wrong product can strip leather of its natural oils, leading to dryness, brittleness, and cracking.
The objective is to remove dirt and contaminants without disrupting the leather's natural pH balance. Most household soaps are alkaline, which is detrimental to the naturally acidic state of tanned leather. Over time, this chemical imbalance is a recipe for material failure.
For this reason, a pH-balanced, dedicated leather cleaner is essential. A formula like the Gold Standard Premium Shoe Cleaner is engineered specifically for this purpose. It creates a gentle foam that lifts contaminants from the pores without over-saturating the leather, providing a deep clean that properly prepares the surface for conditioning.
A word of caution: avoid all-in-one "clean and condition" products. They are a compromise that excels at neither task. A professional-grade cleaning process requires distinct, dedicated products for each step.
Masterclass: The Method for Cleaning Smooth Leather
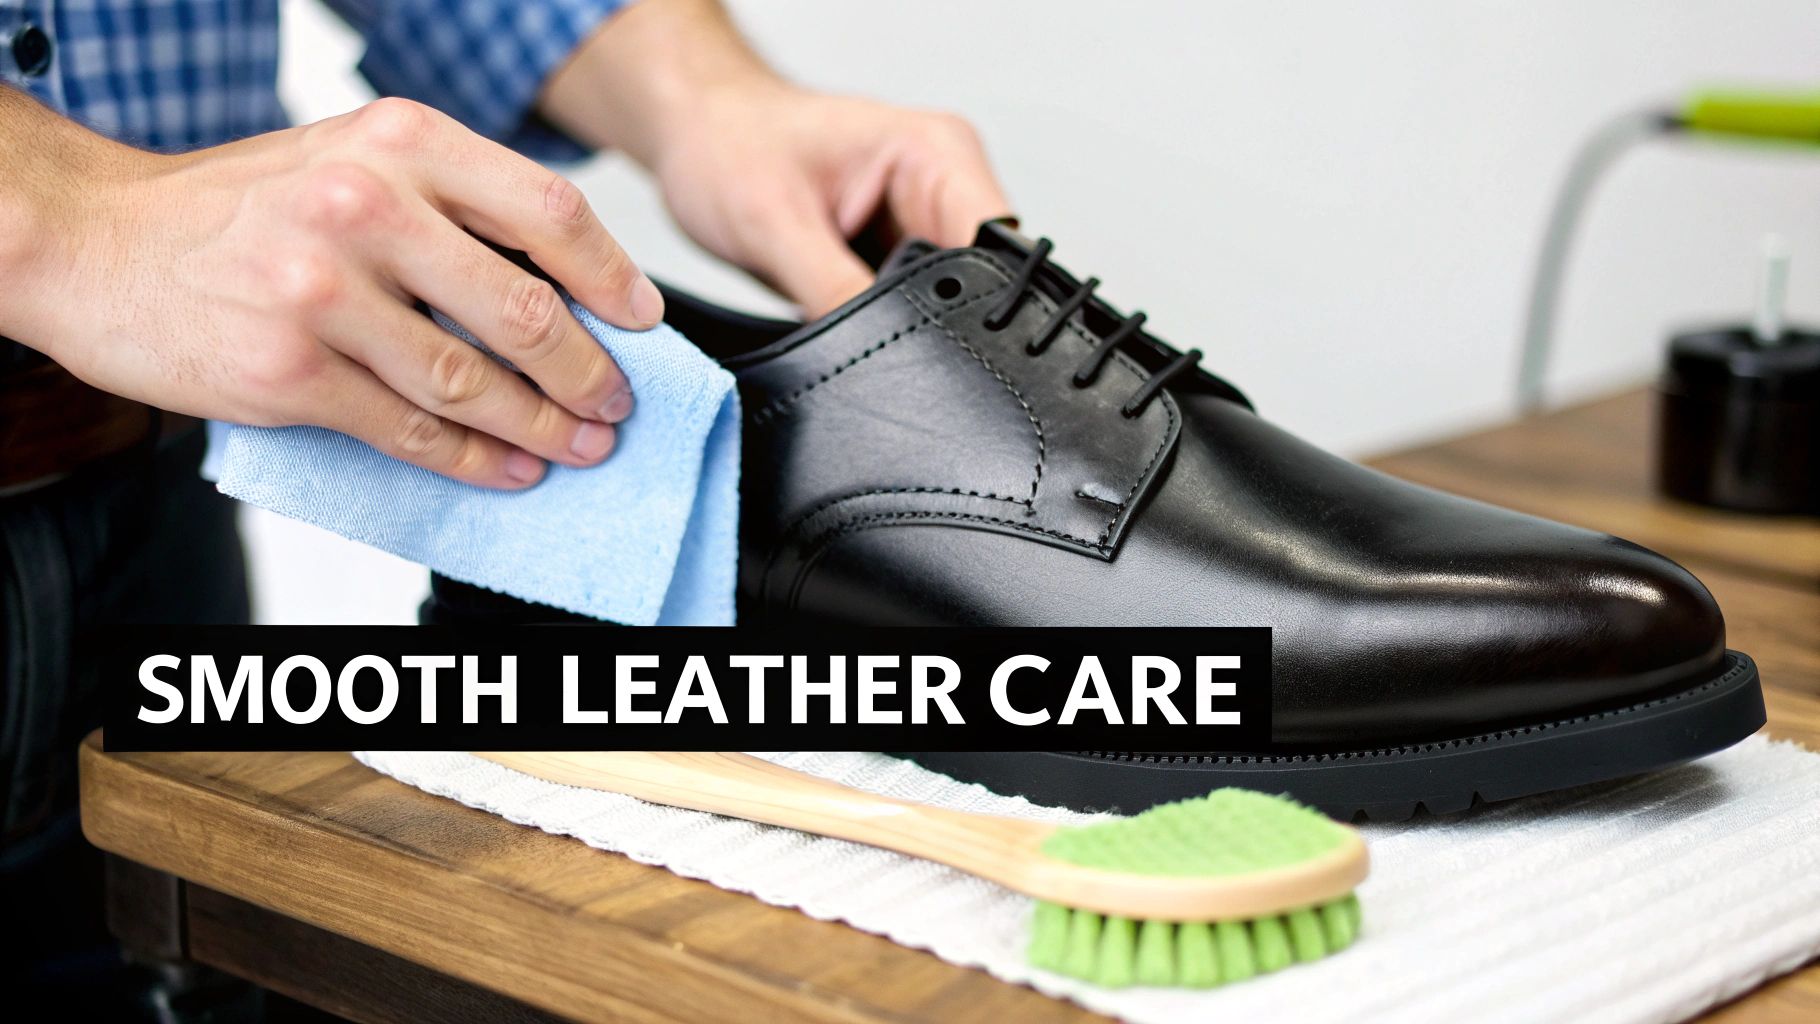
Here, we apply theory to practice. This section details the definitive method for cleaning smooth leather—the type found on classic dress shoes, boots, and many premium sneakers. This is a methodical process that prioritizes the health of the material over speed.
Following these steps will not only clean your shoes but actively preserve their structure and appearance for years to come.
Step 1: Preparation
Proper setup is non-negotiable before any cleaning solution is applied. This stage creates an ideal work surface and prevents the common mistakes that result from taking shortcuts.
First, remove the laces. They trap dirt and obstruct access to the tongue and eyelets, where grime accumulates. The laces can be washed separately in a bowl with a small amount of cleaner and water, then left to air dry.
Next, insert a pair of quality cedar shoe trees. This is a critical step for two reasons: it pulls the leather taut, creating a firm and even surface for effective cleaning, and it ensures the shoe holds its proper shape throughout the cleaning and drying process.
From a professional standpoint, cleaning a shoe without a shoe tree is like trying to iron a shirt while you're wearing it. You need a stable foundation to work against to properly address creases and seams where dirt becomes embedded.
Step 2: The Dry Brush
With the shoes properly prepped, the first action is a thorough dry brushing. The goal is to remove all loose surface contaminants—dust, dried mud, and grit—before introducing any moisture.
Using your soft hog hair brush, employ light, quick strokes across the entire shoe. Pay close attention to the welt (the seam connecting the upper to the sole) and any decorative broguing. This is where the most stubborn debris tends to settle. The motion should be a flicking one, designed to whisk dirt away, not grind it into the surface.
Skipping this step is a fundamental error. Applying cleaner to a dirty surface creates an abrasive slurry that can scratch the leather's finish. It is analogous to sweeping a floor before mopping.
Step 3: Applying the Cleaning Solution
Control is the operative word in this step. The objective is to lift dirt out of the leather's pores, not to saturate the material. Over-wetting leather can lead to water stains and a weakened fiber structure.
Our field-tested method for a safe and effective application is as follows:
- Pour a small amount of a dedicated foam cleaner, such as Gold Standard Premium Shoe Cleaner, into a bowl of cool water.
- Dip your brush into the solution and tap it against the side of the bowl to remove excess liquid. The bristles should be damp, not dripping.
- Gently scrub the entire shoe using small, overlapping circular motions. A light foam will begin to form, indicating that the cleaner is lifting the grime.
- Expert Tip: Begin with the cleaner sections of the shoe and progress toward the dirtiest areas. This prevents the redistribution of heavy soil across the leather.
The global leather care market is expected to reach USD 5.9 billion by 2034, driven by a growing understanding that proper maintenance is the best defense against premature wear. Industry data reveals that improper cleaning techniques can accelerate cracking by 30-50%. Conversely, using appropriate tools—like hog-hair brushes and pH-balanced formulas—can extend a shoe's lifespan and boost its resale value by up to 25%. You can learn more about the trends in the leather care market to understand these industry dynamics.
To aid in this process, here is a quick reference for cleaning different leather types.
Leather Cleaning Quick Reference Guide
This table outlines the essential cleaning steps for common leather types, emphasizing the key tools and critical precautions for each.
| Leather Type | Key Tool | Cleaning Action | Critical Precaution |
|---|---|---|---|
| Smooth Leather | Hog Hair Brush | Gentle circular scrubbing with a damp brush | Avoid oversaturating with water |
| Suede/Nubuck | Suede Eraser & Brush | Dry erase stains, then brush the nap back and forth | Never use water-based cleaners unless specified |
| Patent Leather | Microfiber Cloth | Wipe with a damp cloth; use specialized cleaner | Avoid abrasive brushes that can scratch the finish |
This is a summary; always adapt your technique based on the specific condition and requirements of your footwear.
Step 4: Wiping and Air-Drying
Once the cleaner has been worked over the entire shoe, the foam and lifted dirt must be removed. Use a clean, dry microfiber towel to gently wipe away all residue. Microfiber is ideal for this task due to its high absorbency and lint-free nature.
Finally, the drying phase, which demands patience. Allow the shoes to air dry naturally at room temperature for a minimum of 24 hours.
CRITICAL MISTAKES TO AVOID:
- Never place leather shoes near a radiator, heat vent, or direct sunlight.
- Never use a hairdryer or any other heat source to accelerate drying.
Exposing damp leather to high heat is catastrophic. It causes the protein fibers to constrict and shrink, resulting in stiff, brittle leather that is highly prone to cracking. Keep the shoe trees inserted during drying to ensure the leather maintains its shape and to prevent curling or deep-set creases from forming.
Once completely dry, the shoes are ready for the crucial next step: conditioning.
Conditioning and Protecting Your Leather
Cleaning is only the first phase of proper maintenance. A quality cleaner removes dirt and old products, but it cannot distinguish between those contaminants and the essential oils that keep leather supple. Therefore, conditioning is not an optional step; it is a restorative process that replenishes the material.
Proper conditioning reintroduces fats and oils into the leather's fibrous structure. This maintains flexibility, prevents desiccation, and inhibits the formation of the brittle cracks that permanently damage footwear. A well-conditioned shoe not only looks better but also lasts significantly longer.
The Correct Application of Conditioner
The goal is absorption, not saturation. The leather should readily absorb the conditioner. A light, methodical application is key. Over-application can clog the leather's pores, which paradoxically attracts more dirt and leaves a greasy surface film.
Follow this field-tested technique:
- Use a Soft Applicator: A clean microfiber cloth or a dedicated foam applicator is ideal. Never apply conditioner directly to the shoe, as this leads to uneven, splotchy application.
- Start with a Small Amount: Apply a pea-sized amount of a quality leather conditioner to your cloth. A small quantity is highly effective, and you can always add more to areas that appear particularly dry.
- Work in Gentle Circles: Using light, circular motions, massage the conditioner into the leather. Pay special attention to high-flex areas, such as the vamp and toe box.
- Allow for Penetration: This is where patience is critical. Allow the conditioner to fully penetrate the leather for at least 30-60 minutes. Some heavier, oil-based conditioners may require several hours; always consult the product's instructions.
- Buff Off the Excess: After the designated time, use a clean, dry section of your cloth or a horsehair brush to buff the entire shoe. This action removes any excess product and develops a deep, natural luster.
A common error is rushing the absorption phase. Wiping off the conditioner prematurely removes the nourishment before it has had a chance to fully integrate into the leather's fiber structure. Allow adequate time for rehydration.
Establishing a Protective Barrier
With your shoes cleaned and conditioned, the final step is to shield them from environmental damage. A high-quality protectant spray acts as an invisible barrier, repelling water, dirt, and stains before they can penetrate the leather. Omitting this step leaves your meticulous work vulnerable.
A good protectant creates a hydrophobic layer on the surface, causing water to bead up and roll off rather than soaking in and causing stiffness or salt stains.
For this critical final layer, we recommend Gold Standard’s Water & Stain Repellent. It is formulated to provide robust protection without clogging the leather’s pores, allowing the material to breathe naturally.
Application is simple:
- Hold the can approximately 6-8 inches from the shoe.
- Apply a light, even coat across the entire surface. Do not saturate.
- Allow the shoes to air dry completely for several hours before wearing them outdoors.
This final protective layer simplifies future cleaning sessions and provides the confidence to wear your footwear without constant concern for sudden rain or spills. It is the finishing touch that elevates a simple cleaning to professional-grade preservation.
Adapting Your Technique for Different Leather Finishes
Not all leathers are identical, and a universal cleaning approach is a guaranteed way to cause damage. I have witnessed firsthand how a one-size-fits-all method can strip a unique finish, crush a delicate nap, or exacerbate a minor stain. The ability to adapt your technique to the specific material you are working with is the hallmark of true expertise.
This knowledge provides the confidence to care for your entire footwear collection, from high-gloss patent leather to rugged, oiled work boots. Each material has its own set of rules; mastering them is the key to flawless, repeatable results.
Care for Suede and Nubuck
The soft, velvety nap of suede and nubuck is their main appeal, but it also makes them highly susceptible to stains and moisture damage. For these materials, water is almost always the adversary. A dry-cleaning method is the standard and safest approach.
Do not use standard liquid cleaners or conditioners on these materials. The essential tools are a suede eraser and a dedicated suede brush.
- For Dry Stains and Scuffs: Use the suede eraser to gently rub the affected area. It functions like a pencil eraser, lifting particulate soiling from the fibers.
- To Restore the Nap: After erasing the mark, use your suede brush to lightly brush the area in multiple directions. This action restores the material's texture and removes any eraser residue.
- For Stubborn Stains: In cases of severe staining, a specialized suede-safe cleaner may be used, but only in the smallest possible amount and always after testing on an inconspicuous area first.
The key is a light touch. Aggressive scrubbing will abrade the delicate fibers, creating a permanent bald patch that cannot be repaired.
This infographic simplifies the core principles of leather care into three essential actions.
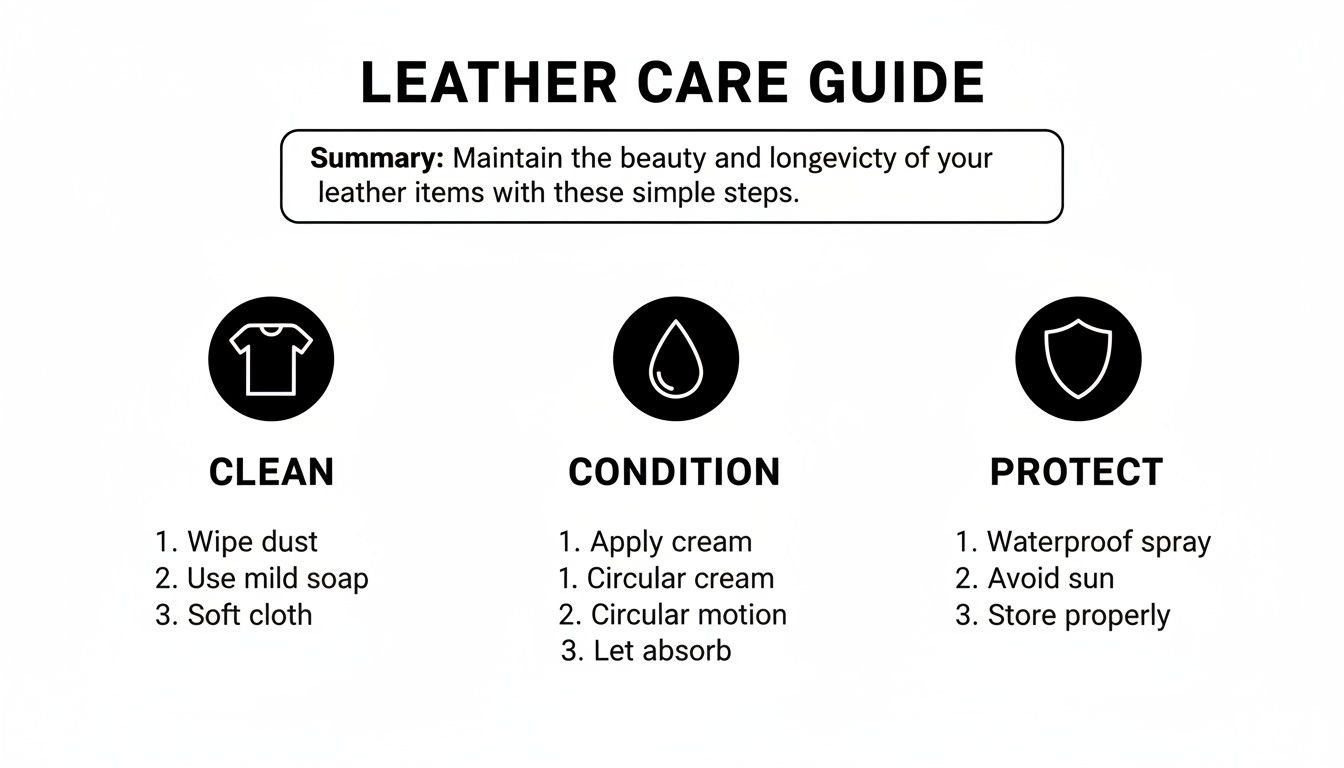
This visual guide reinforces that cleaning, conditioning, and protecting are three distinct yet equally critical stages in a comprehensive shoe care regimen.
Maintaining Patent Leather
Patent leather's high-gloss finish is striking but prone to smudges, scuffs, and clouding. The primary objective is to restore its mirror-like shine without scratching the delicate topcoat.
Avoid all abrasive materials. Your most valuable tool for patent leather is a soft microfiber cloth. For routine cleaning, a cloth lightly dampened with water is sufficient to remove fingerprints and dust. For more stubborn scuffs or streaks, use a dedicated patent leather cleaner. Apply a small amount to the cloth and gently buff the affected area until the shine is restored.
Professional Tip: A frequent mistake is using alcohol-based window cleaners on patent leather. This is highly damaging. These products will strip the finish, causing it to crack or develop a yellow tint over time. Use only products specifically formulated for this material.
Treating Oiled and Waxy Leathers
Oiled or waxy leathers are common on rugged boots and casual footwear, prized for their rich, matte finish and weather resistance. The challenge is to clean them without removing the oils and waxes that define their character and protective qualities.
A gentle approach is mandatory. Begin with a soft brush to remove loose dirt. For a deeper clean, use a damp cloth with a minimal amount of a pH-neutral cleaner. Avoid harsh soaps, as they will aggressively strip the oils from the leather, leaving it looking dry and faded.
After cleaning, it is crucial to re-nourish the leather. Use a conditioner specifically formulated for oiled or "pull-up" leathers. This will replenish the finish and restore its water-resistant properties, ensuring the material remains supple and resilient.
The importance of using correct, material-specific products cannot be overstated. The shoe care market is projected to grow by USD 284.4 million by 2029, largely due to the development of more effective, eco-friendly formulas. This matters, as industry reports indicate that up to 60% of footwear damage is caused by using improper cleaning agents. For all types of shoes, the correct products can extend their functional life by 2-3 years. You can read more about these vital market and regulatory shifts to understand the industry's direction.
Frequently Asked Questions in Leather Shoe Care
Even with the right tools and techniques, challenging situations arise. Over years of professional practice, our specialists have encountered nearly every possible shoe care problem. This section addresses the most common questions we receive, providing expert guidance to help you troubleshoot effectively.
This is your reference for the real-world scenarios that test a shoe care regimen. Knowing how to respond correctly is crucial.
How Often Should I Clean My Leather Shoes?
The ideal cleaning frequency is determined by wear. While there is no universal schedule, these are the professional guidelines I follow.
For shoes worn daily, a quick brushing with a dry horsehair brush at the end of the day is recommended. This two-minute habit prevents dirt from becoming embedded in the leather's pores. A full, deep clean using a cleaning solution should be performed every few weeks, or as soon as they appear soiled.
For special-occasion footwear worn infrequently, the rule is simple: clean them thoroughly after each wear and before returning them to storage.
The most effective strategy is proactive maintenance. Never allow dirt to sit on the leather for extended periods. Consistent, gentle care is always superior to infrequent, aggressive scrubbing sessions that place stress on the material.
Can I Use Household Products Like Vinegar for Cleaning?
My professional advice is unequivocal: do not do this. It is a shortcut with long-term negative consequences. DIY guides often recommend vinegar, baking soda, or dish soap, but these are among the most damaging substances for quality leather.
Vinegar is acidic. It will strip the essential oils from the leather, compromising the protective finish and leaving the surface dry, brittle, and prone to cracking. Baking soda is an abrasive, which will physically wear away the finish of your shoes.
Leather requires products that are pH-balanced and formulated to clean without causing chemical or physical damage. The cost of a proper leather cleaning kit is a small fraction of the cost to repair or replace footwear ruined by inappropriate chemicals.
What Is the Correct Procedure for Water-Soaked Shoes?
Being caught in a heavy rain can feel like a disaster, but swift action can prevent lasting damage. Follow this procedure immediately upon returning indoors:
- Blot, Do Not Rub: Use a soft microfiber cloth to gently blot away surface water. Rubbing can force moisture deeper into the leather's grain.
- Draw Out Internal Moisture: Stuff the shoes tightly with newspaper or, preferably, insert a pair of unfinished cedar shoe trees. Cedar is highly effective at absorbing moisture from the lining while helping the shoe maintain its shape.
- Allow to Air Dry: Place them in a well-ventilated area at room temperature and allow them to dry for at least 24 hours. Patience is essential.
One more critical tip: never, ever use direct heat. Placing wet leather near a radiator, in front of a space heater, or using a hairdryer is the fastest way to cause irreversible shrinkage, cracking, and stiffening. Once fully dry, the leather will likely feel tight. A thorough conditioning is necessary to restore its natural oils and flexibility.
How Should I Handle Tough Stains Like Oil or Scuffs?
For localized, stubborn stains, a general cleaning is insufficient. A targeted approach is required.
For a fresh oil or grease stain, immediately apply cornstarch or talcum powder directly to the spot. Let it sit for several hours; the powder will absorb the oil from the leather's pores. Afterward, gently brush it away.
For scuffs and ground-in dirt, apply a small amount of your leather cleaner directly to the mark. Use a soft-bristled brush and work the cleaner into the stain with a gentle circular motion. For severe stains, such as ink, it is advisable to consult a professional cobbler rather than risk making the problem worse. And always remember the golden rule: test any spot treatment on an inconspicuous area first, such as the inside of the tongue.
Your footwear is an investment in your personal style and daily comfort. Protecting that investment requires more than a superficial wipe-down; it demands the right tools, the right knowledge, and the right technique.
Equip yourself with the Gold Standard Premium Shoe Cleaner Kit and provide your footwear with the professional-grade care it deserves.