
Cleaning canvas footwear is a precise process, not a simple chore. For a result that preserves the material's integrity and restores its appearance, the procedure must be broken down into three stages: preparation, cleaning, and drying.
The process begins with removing all loose, abrasive debris before any liquid is introduced. Following this, a meticulous hand-wash using a material-appropriate cleaner is the superior method. Finally, controlled air-drying away from direct heat is critical to maintaining the shoe's original shape and structural integrity.
Material Analysis: Understanding Canvas
Before beginning, a material assessment is necessary. Canvas is a durable, plain-woven fabric, but its tight weave and absorbent nature make it highly susceptible to trapping dirt and moisture.
Unlike non-porous materials like leather where contaminants sit on the surface, the texture of canvas captures and holds particulate matter deep within its fibers. This characteristic is why superficial wiping is ineffective and why improper cleaning techniques can permanently set stains or damage the material.
Achieving a true clean is a matter of material science, not brute force. It requires working with the canvas. Common errors, such as using aggressive chemicals or high-heat drying, often cause irreversible damage.
Common Cleaning Errors and How to Prevent Them
Hasty methods or incorrect tools will compromise your footwear. These are the most frequent material failures we observe:
- Dye Bleeding: Aggressive, high-pH cleaners or excessive heat can cause dyes in colored canvas to migrate, resulting in streaks and faded patches.
- Material Warping: Never place canvas shoes in a clothes dryer or use direct heat sources like a hairdryer. The intense heat causes the fabric to shrink, warps the shoe's structure, and compromises the fit.
- Adhesive Degradation: The cements bonding the sole to the upper are vulnerable. Harsh solvents and high temperatures weaken these bonds, leading to sole separation.
- Yellowing: A common result of using household bleach on white canvas. The chlorine reacts with the fabric's optical brighteners and fibers over time, causing a permanent, uneven yellow discoloration.
At Gold Standard, our methodology is material-first. Understanding the behavior of canvas—its absorbency, weave, and vulnerabilities—is the foundation for a successful and repeatable cleaning process.
The following process is engineered to avoid these pitfalls. The techniques are designed to lift soil out of the canvas weave without compromising the color, texture, or strength of the fabric. Proper preparation is the most critical phase.
To simplify, here is a procedural overview.
The Correct Canvas Cleaning Protocol
This table outlines the essential stages for restoring your canvas footwear. Consider it a strategic plan for achieving a factory-fresh appearance.
| Stage | Objective | Key Action |
|---|---|---|
| Preparation | Remove surface debris to prevent it from becoming a slurry. | Use a dry brush to dislodge all loose dirt, dust, and grime. |
| Washing | Deep clean the fabric without causing material or structural damage. | Hand-wash with a pH-neutral cleaner and a soft-bristle brush. |
| Stain Treatment | Isolate and lift specific, stubborn contaminants. | Apply a targeted solution appropriate for the chemical nature of the stain. |
| Drying | Dry the shoes evenly while preserving their original shape. | Air-dry in a well-ventilated area, using internal support to maintain form. |
Executing these stages sequentially is fundamental to a deep, uniform clean that protects the longevity of your footwear.
Assembling Your Essential Cleaning Tools
A professional-grade clean is contingent upon using the correct equipment. This means utilizing tools specifically designed for the unique properties of canvas—a material that is both robust and requires a considered approach.
This is a restoration process, not a simple cleaning task. You would not use dish soap to detail a performance vehicle; the same principle applies here. Proper tools do not just clean; they preserve the investment by preventing fiber fraying, discoloration, and long-term structural damage.
Let's assemble the correct kit for restoring your canvas tennis shoes safely and effectively.
The Foundation: A High-Quality Brush
The most critical tool is the brush. The objective is to find a bristle density firm enough to dislodge dirt from the canvas weave yet soft enough to avoid abrading the fabric itself. It is a precise balance.
Through extensive material testing, we have determined that a natural hog-hair brush is the optimal choice. Its bristles possess the ideal combination of stiffness and flexibility, allowing for effective scrubbing without inducing the pilling and fraying commonly caused by inferior synthetic bristles. This is particularly crucial for the initial dry-brushing phase, where abrasive grit is removed.
In fact, a quick dry-brushing after each wear can extend the life of canvas shoes significantly. Dirt and dust act as a micro-abrasive, grinding against the fibers with every step. A simple two-minute routine with a quality brush removes the vast majority of this surface particulate and prevents premature wear. You can learn more about how canvas care extends shoe life and prevents the kind of damage that plagues footwear collections.
Expert Takeaway: Your brush makes direct contact with the shoe. A cheap, stiff synthetic brush can create irreversible micro-tears in the canvas fibers. Over time, this leads to a fuzzy, worn-out appearance long before the shoe's structural life is over.
Essential Components: Cleaner and a Towel
After the brush, the cleaning solution and towel are the next most important elements. These two components directly influence the color, texture, and long-term health of the fabric.
The Cleaner: Mandate a pH-Neutral Formula
Most household cleaners possess an alkalinity or acidity level unsuitable for canvas. A cleaner that is not pH-neutral can strip dye from the fabric or, more commonly, induce a chemical reaction that leaves white canvas with a permanent yellow cast. Always use a solution formulated specifically for footwear. Our Gold Standard Sneaker Cleaner is pH-neutral by design, ensuring it lifts contaminants without altering the shoe’s original color or integrity.
The Towel: Microfiber is Required
Standard cotton towels are inadequate; they deposit lint and have inferior absorbent properties. A high-quality microfiber towel is non-negotiable. Its ultra-fine fibers are exceptionally absorbent, allowing you to blot the shoe and extract both moisture and residual cleaner from the canvas weave. This accelerates drying time and prevents the formation of water spots.
To summarize, your complete canvas cleaning toolkit should contain:
- A soft- to medium-bristle brush (hog hair is optimal)
- A pH-neutral cleaning solution
- One or two clean microfiber towels
- A basin of lukewarm water
With these items, you have the necessary equipment for a professional-level cleaning that will restore your canvas footwear.
The Hand-Washing Method for Optimal Results
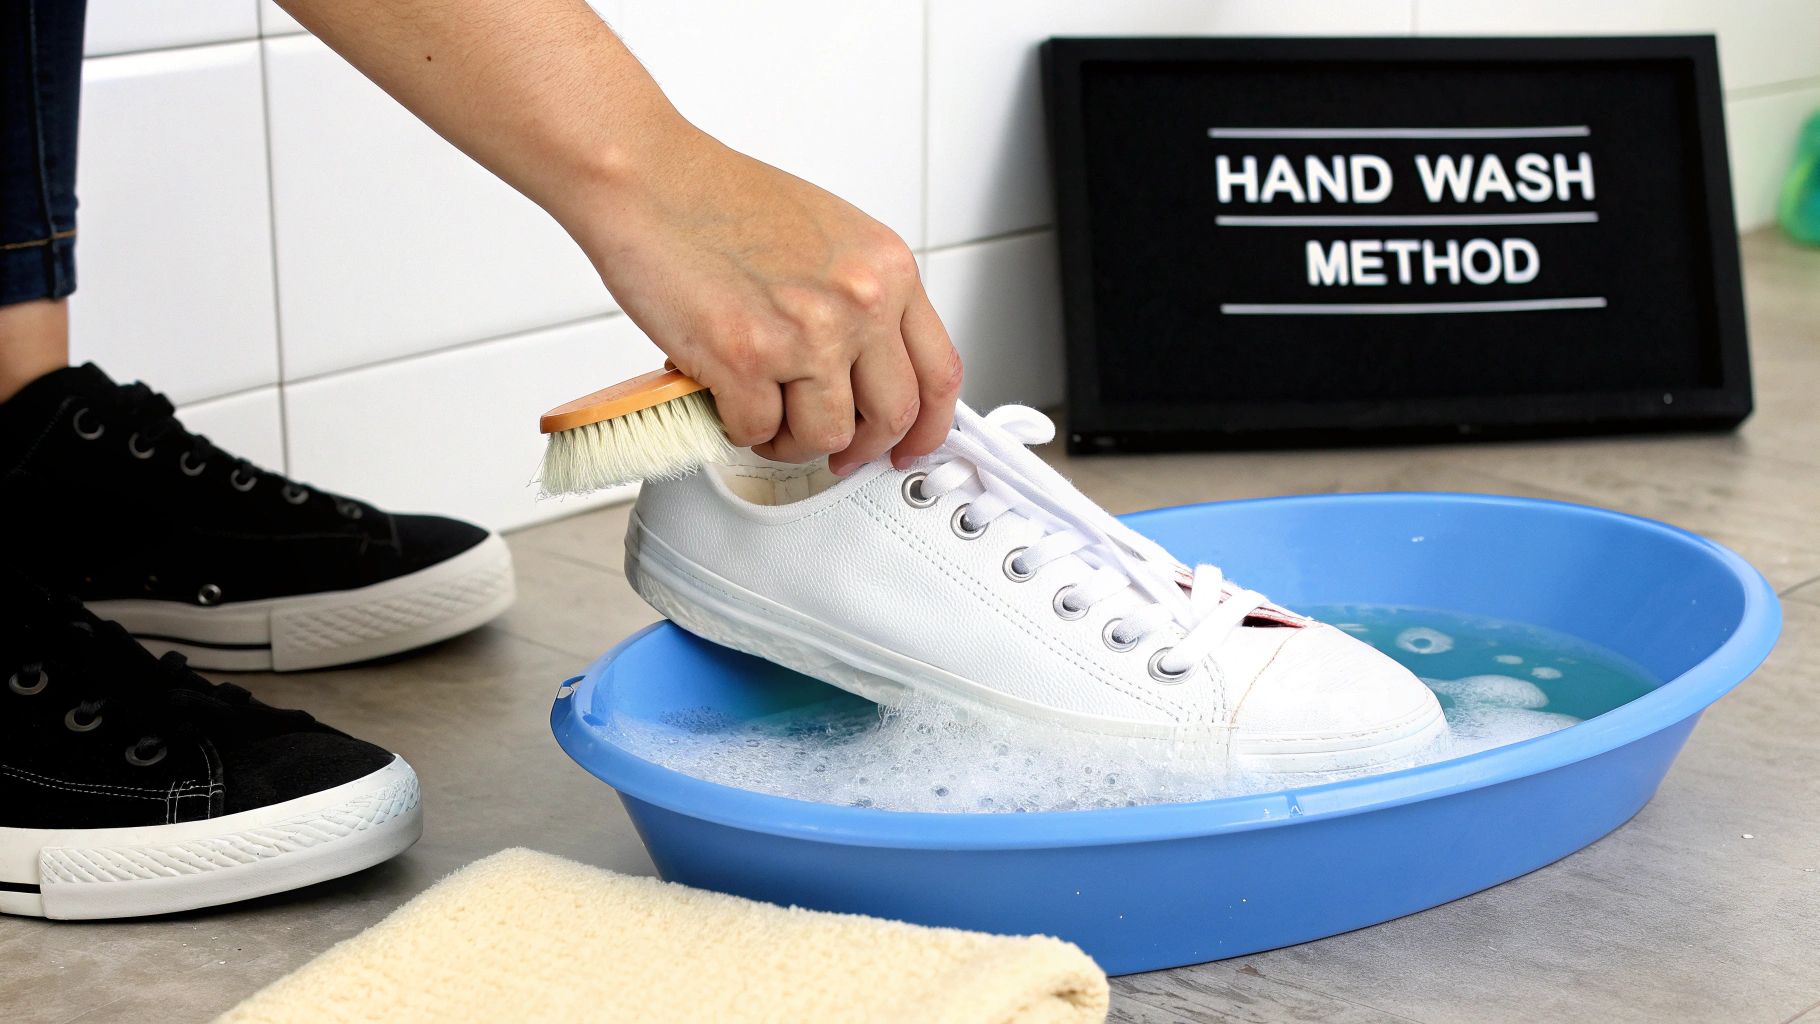
For footwear you value, hand-washing is the only acceptable method. It affords complete control over the process, providing a level of precision a machine cannot replicate. This is the exact protocol we use to preserve high-value footwear.
While machine washing is convenient, it is a gamble. The tumbling action and heat can degrade the adhesives bonding the shoe, leading to sole separation or a warped silhouette. A manual approach is the best defense against such damage.
This is a methodical restoration. We will detail the finer points, from formulating the cleaning solution to the specific motions required to lift dirt from deep within the canvas weave.
Formulating the Optimal Cleaning Solution
The process begins with the cleaning solution. It must be potent enough to break down grime but gentle enough to not affect the fabric's color or texture. An overly harsh cleaner can be as damaging as a stiff brush.
Start with a basin of lukewarm water, approximately 80-90°F (27-32°C). Water that is too hot risks causing dye migration or weakening adhesives. Too cold, and the cleaner will not activate effectively to break down oils and soil.
Add a few drops of a pH-neutral cleaner, such as our Gold Standard Sneaker Cleaner, to the water. Agitate with your brush to create a light foam. The goal is a sudsy solution, not a thick lather that will be difficult to rinse completely.
Expert Tip: Resist the impulse to add more cleaner for a heavily soiled pair. A higher concentration does not equate to a better clean. It increases the likelihood of leaving soap residue in the canvas, which attracts more dirt and can lead to yellowing.
The Correct Brushing Technique for Canvas
With the solution prepared, begin the cleaning process. It is essential to be methodical. Work on one section at a time to prevent cross-contamination from heavily soiled areas to cleaner ones. We recommend starting with cleaner sections, like the tongue and side panels, before addressing high-contact areas like the toe box and heel.
Dip your hog-hair brush into the solution and tap off any excess liquid. The bristles should be damp and soapy, not saturated. Oversaturating the canvas will soak the internal padding, dramatically increasing drying time and risking water stains.
Use small, circular motions to scrub the canvas. This technique is superior to a back-and-forth motion. The circular action allows the bristles to penetrate the weave from multiple angles, gently lifting out dirt rather than merely displacing it.
A light foam should form on the shoe as you work—this indicates the cleaner is active. If this foam becomes discolored with dirt, rinse your brush in clean water before re-dipping it into your solution to avoid reapplying grime.
Cleaning Midsoles and Outsoles
The rubber components require a different approach. While canvas is absorbent and needs a gentle touch, the non-porous rubber midsoles and outsoles can tolerate more pressure. These areas are prone to scuffs and ground-in dirt.
Use the same cleaning solution, but do not hesitate to use a stiffer brush if needed. Work along the length of the midsole, concentrating on any scuff marks. For stubborn marks on white rubber, focused pressure can often lift the transfer completely.
The outsole is where the majority of heavy debris accumulates. The complex tread patterns trap dirt and pebbles. Use your brush to scrub the entire surface, ensuring you dig into the grooves to dislodge any trapped material. A clean outsole not only improves appearance but also helps restore the shoe's intended grip.
Rinsing and Finishing
Removing all soap residue is as critical as the cleaning itself. A common error is submerging the entire shoe, which can waterlog the interior and compromise the shoe’s structure. The objective is to remove all soap from the surface without fully soaking the shoe.
Follow this two-step rinsing protocol:
- Initial Wipe-Down: Take a clean microfiber towel, dip it in fresh, lukewarm water, and wring it out until it is merely damp. Gently wipe all canvas surfaces to remove the initial layer of soiled foam.
- Thorough Rinse: Rinse the towel completely, wring it out again, and repeat the wiping process. Continue until no more soap residue is visible on the towel. This ensures no cleaner is left behind to yellow during the drying phase.
Once clean and rinsed, perform a final pass with a dry microfiber towel to absorb excess surface moisture. This initiates the drying process and prepares the shoe for reshaping—the final step for a professional finish.
When and How to Use a Washing Machine Safely
We will always recommend hand-washing for its precision and control. However, in certain situations involving durable, everyday canvas footwear, a washing machine can be utilized—if and only if the correct protocol is followed.
Placing shoes into a machine unprepared is a recipe for material failure. The aggressive tumbling action can fray canvas, while high heat can melt sole adhesives, resulting in a warped and damaged shoe. This method is reserved for less valuable pairs and should not be a frequent practice.
Consider the washing machine a tool of last resort. The primary goal is to mitigate the damage it is designed to inflict.
The Machine Washing Safety Protocol
To provide any chance of survival, you must create a protective buffer for the shoes within the machine's drum. This involves cushioning the impact and utilizing the gentlest settings available. Do not omit any of these steps.
This process is entirely about damage control. A mesh bag, buffering towels, and a cold, delicate cycle are the only things standing between your footwear and the unforgiving steel drum.
Here is the exact procedure:
- Contain the Shoes: Never place shoes directly into the wash. Enclose them in a mesh laundry bag. This prevents snagging and stops the laces from becoming entangled.
- Buffer the Load: Add two or three old, thick towels to the drum. These act as shock absorbers, cushioning the impact as the drum rotates and preventing the shoes from being battered.
- Use the Right Detergent: A small amount of gentle, liquid detergent is required. Powdered detergents often fail to dissolve completely in cold water, leaving a chalky residue on the canvas.
- Select the Correct Cycle: This is the most critical step. You must use a cold water setting on the most delicate or gentle cycle your machine offers. Hot water is the primary cause of adhesive failure and dye bleeding.
A frequent mistake is using excessive detergent. In a machine, this leads to a sticky residue that is difficult to rinse out—and that residue will attract more dirt later on. Use approximately half the amount recommended for a small load of clothing.
Final Checks Before Starting the Cycle
Once the shoes are bagged, buffered, and the settings are confirmed, you may begin the cycle. Be prepared to remove them immediately upon completion. Allowing them to sit in a damp environment encourages microbial growth and associated odors.
From here, proceed directly to the drying process. Under no circumstances should you place them in a clothes dryer. This would negate all previous precautions. The next step is to begin the air-drying and reshaping protocol to ensure they maintain their proper form.
How to Remove Tough Stains from Canvas
Despite careful wear, stains are inevitable. Oil, grass, or ink can seem catastrophic for canvas footwear. However, most stains are manageable with prompt action and a methodical, chemistry-based approach.
Forget brute force. Aggressive scrubbing or applying the wrong chemical can drive a stain deeper into the fabric or cause permanent discoloration. Our methods focus on lifting the stain out of the canvas weave, not merely bleaching the surface.
Before any treatment, the golden rule is to always spot-test. Apply a small amount of your cleaning solution to a hidden area, such as the inside of the tongue. Wait a few minutes to ensure no color bleeding or material damage occurs before addressing the visible stain.
Common Canvas Stain Treatment Guide
This is a reference guide for common stains. Remember to follow any spot treatment with a gentle rinse of the affected area.
| Stain Type | Recommended First Action | Key Precaution |
|---|---|---|
| Oil & Grease | Blot immediately, then cover generously with an absorbent powder like cornstarch or baking soda. Let sit for at least 30 minutes. | Avoid initial water application; it will repel the oil and can spread the stain. |
| Grass | Dab the stain with a 50/50 solution of white vinegar and water. | Never rub a grass stain. This will grind the chlorophyll pigment deeper into the canvas fibers. |
| Mud | Allow the mud to dry completely. Once brittle, use a dry brush to flake off as much as possible. | Wiping wet mud will only smear it, creating a larger and more difficult stain to remove. |
| Ink | Gently dab the spot with a cotton ball soaked in isopropyl (rubbing) alcohol, working from the outside edge inward. | Use a fresh section of the cotton ball for each dab to avoid redepositing the lifted ink. |
| Coffee/Wine | Blot the fresh spill immediately with a dry cloth, then dab with a solution of mild dish soap and cool water. | Hot water can set tannin-based stains like coffee and wine, making them nearly impossible to remove. |
After the specific stain has been addressed, you can proceed with a general cleaning of the entire shoe. The key is to treat the specific contaminant first.
A Deeper Dive Into Stubborn Stains
Tackling Oily and Greasy Stains
Oil is problematic because it is hydrophobic, rendering standard water-based cleaners ineffective on their own. The primary objective is to absorb as much of the oil as possible before introducing any liquid.
Immediately cover the stain with an absorbent powder like cornstarch or baking soda. Allow it to sit for at least 30 minutes (an hour is preferable). The powder acts as a poultice, drawing the oil out of the canvas fibers. When you brush the powder away, a significant portion of the stain will be removed with it.
From there, treat the remaining spot with your pH-neutral cleaner. Apply a small amount directly to the area, work it in with a soft brush, and rinse carefully with a damp microfiber cloth.
Removing Grass and Mud Stains
Grass stains are essentially dye transfers, while mud is a suspension of soil in water. For mud, patience is the most effective tool. Allow it to dry completely. Attempting to wipe it while wet will embed it into the canvas. Once dry and brittle, most of it can be flaked off.
For residual staining from grass or mud:
- Mix a vinegar solution: Combine equal parts white vinegar and lukewarm water. The mild acid is effective at breaking down the plant pigments in grass.
- Dab, do not rub: Dip a clean cloth into the solution and gently dab the stain. Rubbing will only spread the contaminant.
- Rinse and repeat: Blot the area with a fresh cloth dampened with clean water. This process may need to be repeated several times to lift the stain completely.
A note on bleach: While it may seem like a solution for white canvas, avoid it. Bleach is a harsh oxidant that reacts with canvas fibers, causing them to turn a permanent, sallow yellow over time. It also weakens the fabric, increasing its susceptibility to tearing.
Dealing with Ink and Dye Stains
Ink stains are challenging, and success depends on the type of ink and the speed of response. The goal is to dissolve the ink for extraction. The most effective solvent is typically isopropyl alcohol.
Apply rubbing alcohol to a cotton ball and carefully dab the ink spot. The ink should begin to transfer to the cotton. Use a clean section of the cotton ball for each application to avoid redepositing the ink. Always work from the outside edge of the stain inward to prevent it from spreading.
Once the ink is removed, clean the area with your standard solution to remove any alcohol residue.
This visual guide shows the core principles for a safe machine wash, emphasizing the need for a protective bag, buffering towels, and a cold cycle.
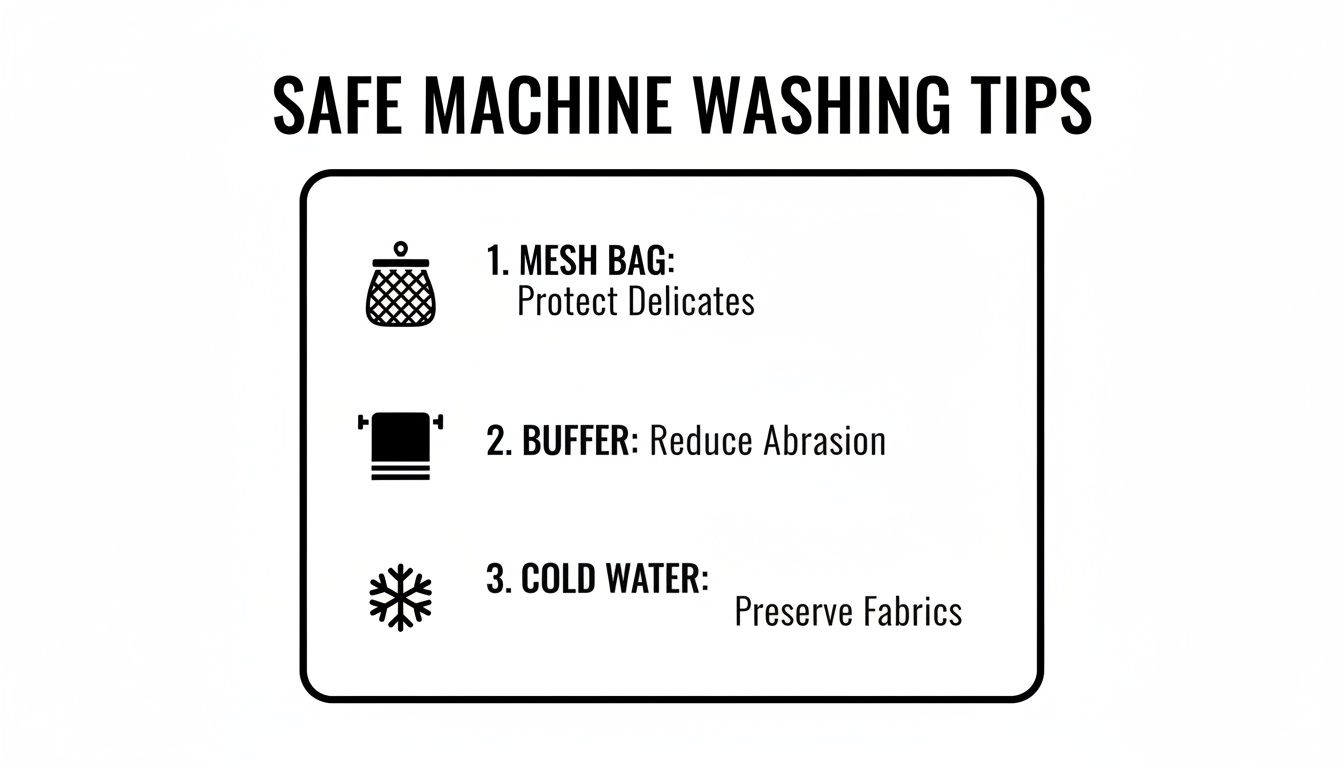
These three elements—the bag, the buffer, and the cold water—are the non-negotiable components of machine washing. They are your primary defense against damaging your shoes in the machine.
The Art of Properly Drying and Reshaping Your Shoes
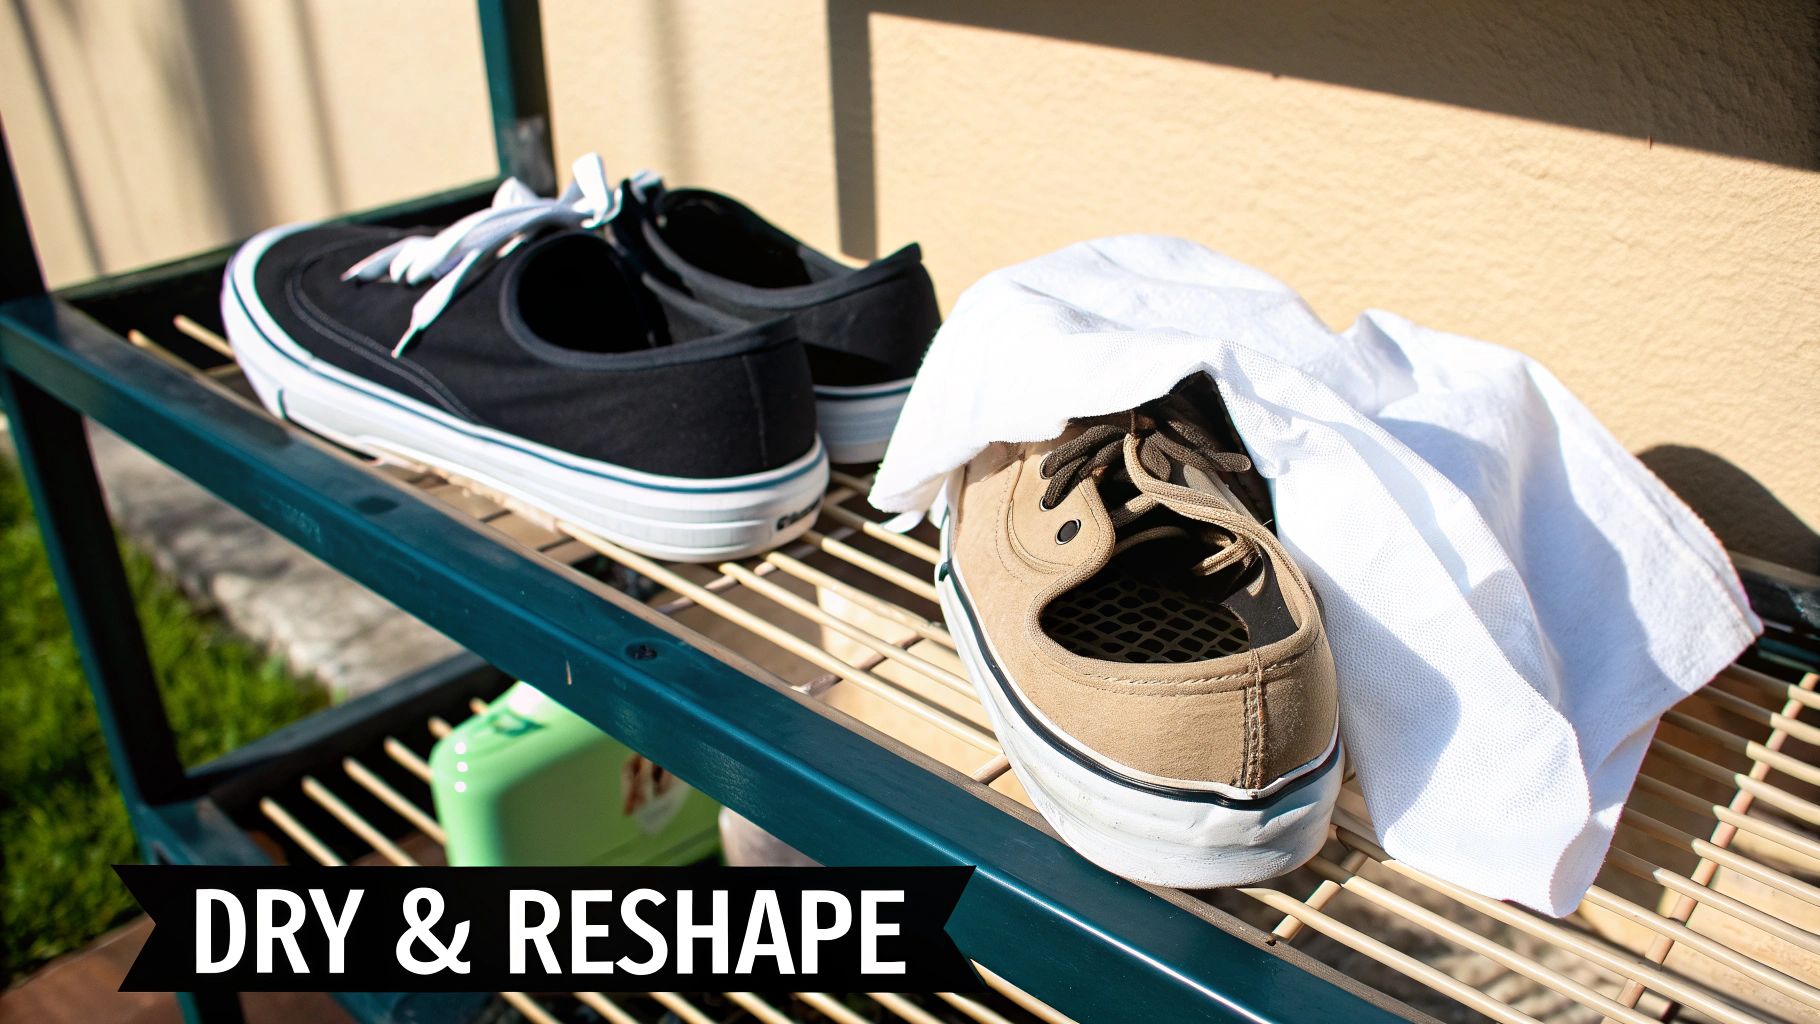
The cleaning process is not complete after rinsing. The drying stage is as critical as the cleaning itself; this is where the shoe's shape is locked in and the restoration is finalized.
The most significant error is the application of heat. Never use a hairdryer, place shoes near a radiator, or put them in a clothes dryer. This is the fastest way to destroy canvas footwear. Intense heat warps the fabric, melts the bonding adhesives, and causes the rubber to become brittle and crack.
The only correct method is air-drying. Select a location with good air circulation, away from direct sunlight, which can fade colors or cause photo-yellowing on white canvas.
Preserving the Shoe's Original Form
As damp canvas dries, it tends to shrink and wrinkle, leaving the shoe with a collapsed appearance. To prevent this, you must provide internal support during the drying process. This simple step separates an amateur cleaning from a professional restoration.
Here are the two best methods for maintaining shape:
- White Paper Towels: Loosely stuff the shoes with plain white paper towels. This serves a dual purpose: it absorbs residual moisture from the interior and provides sufficient structure to prevent the canvas from deforming. Avoid newsprint, as the ink can easily transfer to the damp fabric.
- Adjustable Shoe Trees: For any serious footwear collection, quality shoe trees are a crucial investment. They provide a more consistent and anatomically correct shape than paper towels and allow for better air circulation, promoting a more even dry.
At Gold Standard, we consider this final stage non-negotiable. Proper drying isn’t just about removing water; it’s about resetting the shoe’s structure. A shoe that is cleaned perfectly but dried poorly will never look truly restored.
Patience is required. Allow the shoes to dry completely for a minimum of 24-48 hours. Wearing them while still damp will stretch the fabric and permanently alter the fit. This waiting period is the final component of a flawless restoration.
Frequently Asked Questions in Canvas Shoe Care
Even a comprehensive guide can leave specific questions unanswered. As footwear care specialists, we have encountered nearly every scenario. Here are direct answers to the most common inquiries regarding canvas care.
Can I Use Dish Soap or Bleach on My Canvas Shoes?
No. Most dish soaps contain degreasers, dyes, and fragrances that can leave a residue on or discolor the canvas. This residue is tacky and attracts more dirt, defeating the purpose of cleaning.
Bleach is even more detrimental. While intended to whiten, it causes a chemical reaction that results in permanent, blotchy yellowing on white canvas. Furthermore, it degrades the fabric's cellulose fibers, making them brittle and prone to tearing. Use a cleaner specifically formulated for footwear.
Household cleaners are engineered for non-porous surfaces like countertops, not for dyed, absorbent textiles. Using the wrong chemical agent is the quickest way to cause irreversible damage to footwear.
What is the Proper Frequency for Deep Cleaning Canvas Shoes?
This depends entirely on wear patterns. For a pair in daily rotation, a thorough hand-washing every few weeks is a sound practice to prevent cumulative soiling. For shoes worn less frequently, clean them as needed.
However, preventative maintenance is more effective than a rigid cleaning schedule. Develop the habit of dry-brushing your shoes after each wear. This removes surface-level dust and grit before it can become embedded in the weave, significantly reducing the need for intensive deep cleaning.
Why Did My White Canvas Shoes Turn Yellow After Cleaning?
This is a common and frustrating issue, typically caused by one of two factors. The first is the use of a harsh, oxidizing chemical cleaner, like the bleach previously mentioned.
The more frequent cause, however, is residual soap. If the cleaning solution is not rinsed out completely, the surfactants left behind will oxidize as they dry, turning a dingy yellow. This can sometimes be corrected by re-washing with a pH-neutral cleaner and executing an exceptionally thorough rinse. To prevent it, always use a dedicated shoe cleaner and dry footwear away from direct sunlight.
What is the Correct Method for Washing Laces?
For a truly clean result, laces must be removed. Cleaning around them is ineffective.
Once removed, there are two simple options. You can place them in a small mesh laundry bag and include them with a regular load of laundry on a cold cycle. Alternatively, hand-wash them in a bowl of warm water with a small amount of shoe cleaner, using a brush to agitate stubborn dirt. Ensure they are completely air-dried before re-lacing the shoes.
A professional-level clean that protects your footwear requires tools designed for the task. Gold Standard provides premium, pH-neutral cleaning solutions and expert-grade brushes engineered to achieve superior results without causing damage. Check out our complete shoe care kits and give your sneakers the treatment they deserve.