
Mastering how to clean canvas footwear begins with a foundational principle: always start with the least aggressive method. The internet is filled with cleaning "hacks" that promise instant results but often cause irreversible damage, from weakening the fabric's weave to leaving behind permanent yellow oxidation stains.
Effective canvas care is not about quick fixes; it's about understanding the material's properties and executing a methodical, preservation-focused approach.
The Fundamentals of Canvas as a Material
Before any cleaning begins, it's critical to understand the material itself. Canvas is a plain-woven fabric prized for its durability and breathability. However, its absorbent, textured nature makes it highly susceptible to trapping dirt, moisture, and stains deep within its fibers.
Unlike the non-porous surface of finished leather, canvas cannot simply be wiped clean. This is where most cleaning attempts fail. Treating canvas footwear with excessive force or improper chemistry leads to permanent material degradation. Harsh chemicals, aggressive scrubbing, and high-heat drying are the primary culprits behind damaged footwear.
Common Cleaning Methods to Avoid
Over years of professional material care, we have identified several common but damaging myths that lead to footwear destruction.
-
The Washing Machine: Submerging and machine-washing canvas footwear is a catastrophic error. The combination of high heat, aggressive tumbling, and harsh detergents can warp the shoe’s structure, dissolve the adhesives bonding the sole, and cause the canvas to fray or shrink. This method is never advisable.
-
Harsh Household Chemicals: The use of bleach or abrasive household cleaners is a common mistake. While they may appear to lift a stain initially, these chemicals strip color and, more critically, cause the cotton fibers to break down, resulting in a permanent yellow tint from oxidation. This chemical damage weakens the fabric, leading to premature tearing.
-
Aggressive Scrubbing: Applying excessive pressure with a stiff brush does not result in a cleaner shoe; it destroys the weave. This action abrades the fibers, creating a "fuzzy" texture and can push particulate matter deeper into the material, compounding the problem.
At Gold Standard, our approach is material-first. The objective is not merely stain removal, but the preservation of the footwear's structural integrity, color, and form over its entire lifespan.
Adopting a Professional Methodology
Mastering canvas care requires a diagnostic mindset. You must learn to differentiate between light surface scuffs that require targeted spot cleaning and deeply embedded grime that necessitates a full deep clean. Every cleaning scenario should begin with an assessment.
The core principle is to begin with the least invasive technique and only escalate if necessary. This prevents oversaturation of the fabric and the use of unnecessarily strong chemical agents. Understanding the unique properties of canvas and avoiding these common pitfalls is the first step in moving from merely cleaning footwear to actively preserving it.
Your Essential Canvas Cleaning Toolkit
Attempting to clean footwear without the correct tools will yield substandard results. Precision is paramount. The right equipment not only facilitates a more effective process but also prevents the common mistakes that can permanently damage a pair of shoes.
A professional-grade clean is contingent on having the correct tools for each specific material and task.
Essential Toolkit Components
A well-curated kit is non-negotiable for safe and effective cleaning. These are the tools we rely on for consistent, professional results.
| Tool | Purpose & Technical Specification | Gold Standard Recommendation |
|---|---|---|
| Soft-Bristled Brush | To gently agitate and lift dirt without abrading the canvas weave. Natural fibers are ideal for foam generation. | Our Premium Shoe Cleaning Brush uses soft hog hair, engineered to produce a rich cleaning foam without damaging delicate uppers. |
| Cleaning Solution | To break down dirt and stains chemically without stripping color or leaving a residue that attracts more dirt. | The Gold Standard Premium Shoe Cleaner is a pH-neutral formula designed to be effective on grime yet safe for canvas and other sensitive materials. |
| Microfiber Towels | For blotting away contaminated foam and for the final wipe-down. High absorbency is critical for moisture management. | A minimum of two towels are required for a proper cleaning cycle. |
| Bowl of Cool Water | To dilute the cleaner and rinse the brush. | Never use hot water. It can weaken glues and cause dyes to bleed. |
These core items prepare you for nearly any cleaning scenario, from routine maintenance to a full restoration.
Expert Insight: A frequent mistake is using a single, stiff brush for the entire shoe. Canvas uppers require a soft brush. The rubber midsoles can withstand a stiffer bristle. Using the correct brush for each material is fundamental to achieving a professional result.
Pre-Cleaning Preparation
Before any cleaning solution is applied, several preparatory steps are essential for optimal results. The objective is to remove all loose, dry surface contaminants first. Skipping this stage turns dry dirt into mud, driving it deeper into the fabric.
First, remove laces and insoles. They must be cleaned separately. Laces can be submerged in a small bowl with cleaning solution and hand-washed. Insoles can be gently scrubbed and set aside to air dry completely.
Next, perform a thorough dry brushing. Use your soft-bristled brush to go over the entire shoe, dislodging any caked-on mud, dust, and other loose debris. Pay close attention to seams and the junction where the canvas meets the sole, as these areas collect grit.
This preparation ensures the cleaning solution can work directly on embedded stains rather than surface-level dust. You are now prepared to begin cleaning.
Method 1: Spot Cleaning for Light Contamination
The key to maintaining canvas footwear is not infrequent, intensive cleaning sessions, but consistent, minor maintenance. Most daily wear does not require a full deep clean; it requires targeted spot treatment to manage light grime before it becomes a major issue.
This is preventative care. By addressing minor scuffs and dirt as they occur, you prevent them from being ground deep into the canvas fibers, where they become significantly more difficult to remove.
The Controlled Foaming Technique
The objective here is precision, not saturation. The goal is to lift dirt out of the fabric using a light foam and blot it away, leaving the material as dry as possible. This requires only your cleaning solution, a soft-bristled brush, a microfiber towel, and a bowl of cool water.
This practical approach differs significantly from archival textile conservation practices, which involve highly specialized and time-consuming methods. Our goal is effective, real-world care that balances cleaning efficacy with material preservation. The focus is on control—you are not washing the entire shoe, only treating the affected areas.
Solution Preparation and Application
First, mix a small amount of concentrated cleaner into cool water. With a professional-grade product like the Gold Standard Premium Shoe Cleaner, only a few drops are needed to create an effective solution.
Next, dip only the tip of your soft-bristled brush into the solution. Allow excess water to drip off; the bristles should be damp, not saturated.
Gently agitate the soiled areas of the canvas using light pressure and small, circular motions. A light foam will begin to form. This foam is what encapsulates and lifts the dirt from the fibers.
Field Tip: Resist the impulse to scrub aggressively. The cleaning solution is formulated to perform the chemical work. Excessive force, even with a soft brush, can cause pilling and fraying of the canvas over time. The circular motion is key to lifting the stain effectively.
For a more stubborn mark, apply one additional drop of cleaner directly to the brush and repeat the process on the specific area. Avoid oversaturating the canvas. The material should only feel slightly damp to the touch.
Blotting and Feathering for a Seamless Finish
Once the soiled areas are foamed, this next step is critical for preventing water spots or cleaning rings from forming as the shoe dries. Take a clean, dry microfiber towel and blot the foamed areas. Do not rub. Press firmly to absorb the dirty foam and moisture.
Next, dampen a separate, clean section of your towel with plain water. Use this to perform a final, light wipe-down over the entire shoe, not just the treated spots. This technique, known as "feathering," blends the cleaned area with the rest of the shoe, ensuring a uniform appearance upon drying.
This final wipe also removes any residual cleaning solution. Soap residue becomes tacky when dry and acts as a magnet for new dirt, negating your work. The canvas should be left evenly and minimally damp. This is the ideal process for weekly upkeep.
Method 2: Deep Cleaning for Heavy Soiling
When routine spot cleaning is insufficient—after exposure to significant mud, festival grounds, or widespread staining—a more comprehensive approach is required.
For deeply embedded stains, the strategy must change. It is critical to pre-treat specific, stubborn stains before proceeding with a general cleaning of the entire shoe. This targeted approach prevents the spreading of concentrated stains and ensures a uniform, factory-fresh finish. The decision to spot-treat versus deep clean is a matter of judgment based on the extent of the soiling.
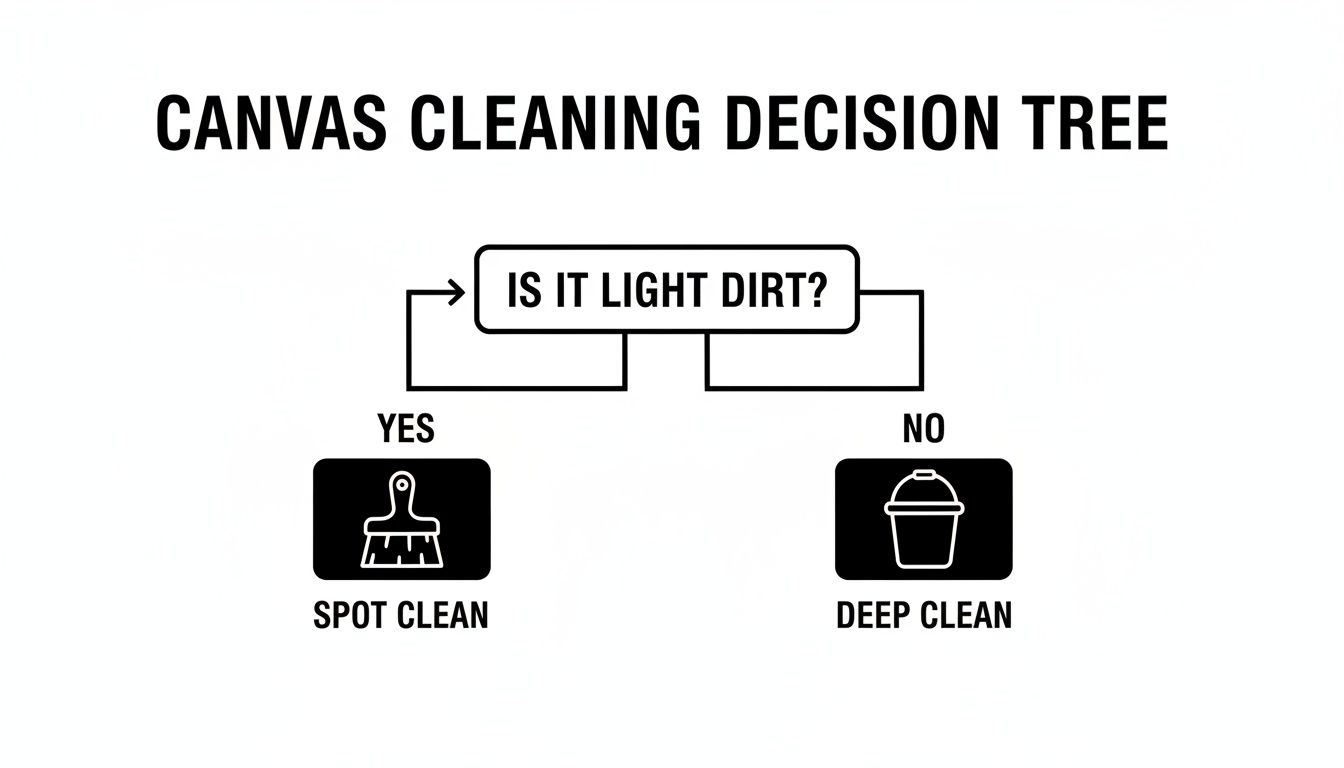
Minor scuffs require a targeted approach. Widespread grime demands a thorough, methodical deep clean.
Field Techniques for Common Stains
Different types of stains require different chemical and mechanical approaches. A single, one-size-fits-all method is ineffective. These are field-tested techniques for common canvas stains, prioritizing fabric safety.
- Mud and Dirt: Patience is essential. Allow mud to dry completely. Attempting to wipe wet mud will only embed it deeper into the canvas fibers. Once fully dry and caked, use a stiff brush to flake off as much of the solid material as possible before introducing any liquid cleaner.
- Grass Stains: These are pigment-based stains. Create a thick paste using Gold Standard Premium Shoe Cleaner and a few drops of water. Apply this paste directly to the stain, allow it to dwell for 15-20 minutes to break down the chlorophyll, then gently agitate with a soft-bristled brush before cleaning the entire shoe.
- Oil and Grease: Do not apply water first. Immediately upon contact, blot the stain with a clean cloth to absorb excess oil. Then, cover the area completely with an absorbent powder like cornstarch or baking soda. Let it sit for several hours to draw the oil out of the canvas fibers. Scrape away the powder, then treat the remaining residue with your cleaning solution.
Expert Insight: Always test any cleaning solution on an inconspicuous area first, such as the inside of the tongue. This simple precaution ensures the solution will not cause any discoloration or textural damage before you address a visible stain.
Executing a Full Deep Clean
For heavily soiled footwear, a full deep clean is necessary to restore the entire upper. The process is more involved but essential for bringing shoes back from severe contamination. The objective is to clean the entire canvas upper for a uniform appearance, removing all embedded grime without oversaturating the material, which can warp the shoe's shape.
Prepare a larger bowl of cool water and your cleaning solution. After removing laces and performing a thorough dry brushing, begin applying the foamed solution across the entire shoe, working methodically in small, manageable sections. Concentrate on seams and the area around the eyelets, where dirt accumulates.
A critical professional technique is to maintain a clean brush. After cleaning a section, rinse the brush thoroughly in your water bowl to remove the lifted dirt. Then generate new foam. This prevents the redistribution of grime from one part of the shoe to another. Our methods are a practical application of principles used in professional restoration, far removed from the delicate techniques used on historical artifacts like those discussed in publications on conserving canvas paintings.
Rubber Midsole and Outsole Treatment
While canvas requires a gentle touch, the vulcanized rubber components of footwear can withstand more aggressive cleaning. Stubborn scuff marks on white midsoles often resist standard cleaning solutions.
For these marks, a mild abrasive paste is highly effective.
- Mix equal parts baking soda and water to form a thick paste.
- Apply it directly to the scuffed areas of the midsole.
- Use a medium-stiffness brush to scrub the paste in small, circular motions.
- Wipe away all residue with a damp microfiber towel.
This method provides sufficient abrasion to lift scuffs without scratching the rubber. After the uppers and midsoles are clean, give the outsoles a final scrub to remove any remaining debris. The shoes are now ready for the critical drying phase.
The Drying and Protection Phase
The cleaning process is incomplete until the footwear is properly dried. This stage is as critical as the cleaning itself. Improper drying can lead to shrunken fabric, a distorted shape, and failure of the sole's adhesive bonds.
The most significant error is the application of direct heat. Tumble dryers, hair dryers, radiators, or direct sunlight will cause irreparable damage. Heat degrades the midsole compounds and makes the canvas brittle. Patience and air circulation are the only correct tools for this job.
The Correct Air-Drying Protocol
The objective is to remove moisture efficiently while preserving the shoe's original shape. Air circulation is your primary tool; heat is your primary adversary.
First, address internal moisture. Lightly stuff the shoes with clean paper towels or, preferably, insert cedar shoe trees. Paper towels effectively wick moisture from the lining but must be replaced every few hours as they become saturated.
Cedar shoe trees are the professional standard. They absorb moisture while perfectly maintaining the shoe's shape, preventing the common collapse of the toe box as the canvas dries. This detail significantly impacts the final appearance.
Field Tip: Do not overstuff with paper towels. Forcing too much material inside can stretch the canvas and permanently alter the fit. The goal is to fill the volume, not expand it.
Once stuffed, place the shoes in a cool, dry location with good air circulation. Near an open window (out of direct sunlight) or in a shaded, well-ventilated area is ideal. Avoid humid environments like basements, which slow drying and can promote mildew growth. Depending on ambient humidity and initial saturation, allow 8 to 24 hours for the shoes to dry completely.
Applying a Protective Barrier
Once the shoes are 100% dry—do not rush this stage—it is time for the final, crucial step that distinguishes amateur care from professional preservation. Applying a protective barrier will keep your footwear cleaner for longer and simplify future cleaning efforts.
A high-quality protective spray creates a hydrophobic layer on the canvas, repelling water, dirt, and oil. Spills will bead up on the surface for you to wipe away, rather than soaking in and creating a permanent stain. Select a spray specifically formulated for fabric and canvas to ensure it does not alter the color or inhibit the material's breathability.
Professional Application Technique
Even coverage is essential for effective protection.
- Ventilate: Always apply protectant sprays outdoors or in a well-ventilated space.
- Maintain Distance: Hold the can approximately 6-8 inches from the shoe. This distance creates a fine, even mist rather than a concentrated, wet application.
- Apply Light Coats: Spray the entire shoe using a smooth, sweeping motion. The goal is a light, consistent coat, not a saturated one.
- Allow to Cure: Let the first coat dry for approximately one hour, then apply a second light coat for maximum efficacy.
- Final Cure: Allow the shoes to cure for a full 24 hours before wearing. This gives the protective barrier time to fully bond with the canvas fibers.
This final step is the single best defense against future stains. Reapply the protectant every few weeks, or after each deep clean, to maintain the protective shield.
Frequently Asked Questions About Canvas Care
Even with a detailed guide, specific challenges arise. Here are direct, expert answers to the most common questions we encounter.
Is it acceptable to use dish soap on canvas shoes?
This is the most frequent query. While a mild dish soap may be used in an emergency for a minor stain, it is not recommended for regular use.
Household soaps often contain dyes, fragrances, and degreasers that are too aggressive for canvas fibers. They frequently leave behind a sticky residue that attracts more dirt. More critically, they can cause color fading or, on white canvas, contribute to yellowing over time. A pH-neutral cleaner formulated specifically for footwear is always the safer and more effective choice.
How do I fix yellowing on white canvas?
Yellowing is typically caused by oxidation or the chemical residue left by harsh cleaners like bleach. Prevention is far easier than reversal.
If yellowing has already occurred, the first step is a thorough deep clean using a quality, pH-neutral shoe cleaner. For persistent discoloration, create a paste of baking soda and a small amount of water. Apply this paste directly to the yellowed areas, let it dwell for 30 minutes, then gently scrub with a soft brush before cleaning the entire shoe. This method can help lift the discoloration without further damaging the fabric.
Expert Takeaway: Canvas restoration is a process of finesse, not force. It relies on proper chemistry to gently lift stains, similar in principle to professional mechanical surface cleaning methods used in textile conservation.
Can I put my canvas shoes in the washing machine?
To reiterate a critical point: never machine wash your footwear. A washing machine subjects shoes to a destructive combination of high heat, harsh detergents, and violent tumbling.
This process causes a cascade of failures:
- Adhesive Dissolution: Heat melts the glues bonding the outsole to the upper, causing separation.
- Structural Warping: The shoe's last and shape are irreversibly damaged.
- Fabric Degradation: The canvas can shrink, fray, or develop weak points that lead to tearing.
Manual cleaning is the only method that provides the control necessary to protect your investment.
How should I remove mold and mildew?
The appearance of black or green spots indicates mildew, typically caused by storing footwear while damp or in a humid environment. First, take the shoes outdoors and use a dry, stiff brush to remove as much surface mold as possible to prevent spore dispersal inside your home.
Next, create a solution of equal parts cool water and white vinegar. Gently scrub the affected areas with this mixture using a soft brush. Let it sit for approximately one hour, then perform a full deep clean with your standard shoe cleaner to remove the vinegar odor and any remaining residue. Finally, ensure the shoes dry completely in a location with excellent air circulation to prevent recurrence.
Maintaining your canvas footwear does not need to be a complex task. With the correct techniques, tools, and consistency, you can preserve them for years to come. For a reliable, professional-grade result every time, Gold Standard provides the material-safe products required to do the job correctly.